一、DataSource 1.1 HikariDataSource数据源 如果未指定数据源,SpringBoot中默认使用HikariDataSource数据源。
使用其进行数据库的CRUD操作步骤:
1、确保项目引入了JDBC场景
1 2 3 4 <dependency > <groupId > org.springframework.boot</groupId > <artifactId > spring-boot-starter-data-jdbc</artifactId > </dependency >
官方的JDBC启动器没有引入数据库驱动,我们需要根据需求,引入指定的数据库驱动,以MySQL为例:
1 2 3 4 5 <dependency > <groupId > mysql</groupId > <artifactId > mysql-connector-java</artifactId > <version > 5.1.49</version > </dependency >
我们要确保数据库版本和数据库驱动版本一致。SpringBoot2.5.2中的MySQL驱动版本是8,则需要数据库版本也是8以上。
如果想要修改驱动版本,有两种方式:
直接依赖引入具体版本(maven的就近依赖原则),比如上面的做法。
重新声明版本(maven的属性的就近优先原则),比如下面的做法:
1 2 3 4 5 <properties > <java.version > 1.8</java.version > <mysql.version > 5.1.49</mysql.version > </properties >
2、分析自动配置
分析SpringBoot为我们自动配置好的配置,通过分析源码可知,底层配置好了HikariDataSource连接池,以及事务管理器,分布式事务等。
底层还有一个JdbcTemplate组件。
连接池的配置可以使用spring.datasource配置。
3、修改配置项
在配置文件中,配置以下内容:
1
2
3
4
5
6
7
8
9
10
11
spring: datasource: url: jdbc:mysql://localhost:3306/springboot?useSSL=false&characterEncoding=UTF-8&serverTimezone=UTC username: root password: 123456 driver-class-name: com.mysql.jdbc.Driver jdbc: template: query-timeout: 3
4、测试
1
2
3
4
5
6
7
8
9
10
11
class Boot05WebAdminApplicationTests @Autowired @Test public void test () "select count(*) from books" , Long.class);
1.2 Druid数据源 Druid项目地址:https://github.com/alibaba/druid
整合第三方技术有两种方式:
1.2.1 自定义方式 1、引入依赖
1 2 3 4 5 <dependency > <groupId > com.alibaba</groupId > <artifactId > druid</artifactId > <version > 1.1.22</version > </dependency >
2、并创建数据源
创建数据源,可以根据需求定义一些配置。可以使用传统XML的方式注册bean
1 2 3 4 5 6 <bean id ="dataSource" class ="com.alibaba.druid.pool.DruidDataSource" destroy-method ="close" > <property name ="url" value ="${jdbc.url}" /> <property name ="username" value ="${jdbc.username}" /> <property name ="password" value ="${jdbc.password}" /> </bean >
也可以定义一个配置类,在配置类中使用@Bean注册组件:
1 2 3 4 5 6 7 8 9 10 11 12 13 14 15 16 17 18 19 @Configuration public class MyDataSourceConfig @Bean @ConfigurationProperties("spring.datasource") public DataSource dataSource () throws SQLException new DruidDataSource();return druidDataSource;
将账号密码等信息配置在配置文件中:
1
2
3
4
5
6
spring: datasource: url: jdbc:mysql://localhost:3306/ssmbuild?useSSL=false&characterEncoding=UTF-8&serverTimezone=UTC username: root password: 123456 driver-class-name: com.mysql.jdbc.Driver
3、测试
1
2
3
4
5
6
7
8
9
10
11
12
@Controller public class DataSourceController @Autowired @ResponseBody @GetMapping("/sql") public String druidTest () "select count(*) from books" , Long.class);return aLong.toString();
1.2.2 使用官方starter 1、引入starter
1 2 3 4 5 <dependency > <groupId > com.alibaba</groupId > <artifactId > druid-spring-boot-starter</artifactId > <version > 1.1.17</version > </dependency >
启动器为我们自动引入了数据源
2、分析自动配置
根据源码,分析官方已经配置好的配置,已经配置参数的使用。
可以使用spring.datasource.druid在配置文件中对druid进行各项的配置。
3、配置示例
可以参考:https://github.com/alibaba/druid/tree/master/druid-spring-boot-starter
1
2
3
4
5
6
7
8
9
10
11
12
13
14
15
16
17
18
19
20
21
22
23
24
25
26
27
28
29
30
31
spring: datasource: url: jdbc:mysql://localhost:3306/db_account username: root password: 123456 driver-class-name: com.mysql.jdbc.Driver druid: aop-patterns: com.atguigu.admin.* filters: stat,wall stat-view-servlet: enabled: true login-username: admin login-password: admin resetEnable: false web-stat-filter: enabled: true urlPattern: /* exclusions: '*.js,*.gif,*.jpg,*.png,*.css,*.ico,/druid/*' filter: stat: slow-sql-millis: 1000 logSlowSql: true enabled: true wall: enabled: true config: drop-table-allow: false
二、整合MyBatis SpringBoot整合MyBatis的主要步骤如下:
导入MyBatis的官方starter
编写mapper接口,并使用@Mapper接口注册。
编写Service类
编写映射文件,绑定mapper接口
在总配置文件application.yaml中指定映射文件的位置,以及MyBatis配置文件的位置(建议直接将MyBatis的配置写在总配置文件中)。
2.1 配置模式 1、引入stater
首先引入官方starter,其为我们配置好了SqlSession
pom.xml
1 2 3 4 5 6 <dependency > <groupId > org.mybatis.spring.boot</groupId > <artifactId > mybatis-spring-boot-starter</artifactId > <version > 2.1.4</version > </dependency >
2、编写mapper和service
编写mapper接口和service层,所有的Mapper接口都需要使用@Mapper注解标注,表示注册当前接口为Mapper。
BookMapper.java
1
2
3
4
@Mapper public interface BookMapper public Book getBookById (int id)
也可以在SpringBoot启动类上,使用@MapperScan("com.kang.admin.mapper") 注解,表示将指定包下的所有类统一注册为Mapper,这样其中的接口就可以不用单独使用@Mapper注解。
@Mapper的功能类似于@Repository,都是用在DAO层,表示注册当前类。
@Mapper不需要配置扫描地址,而@Repository需要配置扫描地址。
SpringBoot中一般使用@Mapper注解。
源码对@Mapper的解释:Marker interface for MyBatis mappers
BookService.java
1
2
3
4
5
6
7
8
@Service public class BookService @Autowired public Book getBookById (int id) return bookMapper.getBookById(id);
3、编写sql映射器文件并绑定mapper接口
BookMapper.xml
1
2
3
4
5
6
7
8
9
10
<?xml version="1.0" encoding="utf-8"?> <!DOCTYPE mapper PUBLIC "-//mybatis.org//DTD Mapper 3.0//EN" "http://mybatis.org/dtd/mybatis-3-mapper.dtd" > <mapper namespace ="com.kang.admin.mapper.BookMapper" > <select id ="getBookById" resultType ="com.kang.admin.bean.Book" > </select > </mapper >
在application.yml中指定MyBatis的映射器文件 和MyBatis总配置文件 的位置。
application.yml
1 2 3 4 5 6 7 ... mybatis: config-location: classpath:mybatis/mybatis-config.xml mapper-locations: classpath:mybatis/mapper/*.xml
mybatis-config.xml
这里的路径,应该是编译后的配置文件路径,resources下的文件都会被直接编译到target目录下。
我们也可以在application.yml中的mybatis.configuration,对MyBatis进行配置,比如驼峰命名映射等,取代mybatis-config.xml配置文件。推荐这一种方式,尽量不写多余的配置文件。
比如:
1 2 3 4 5 6 mybatis: mapper-locations: classpath:mybatis/mapper/*.xml configuration: map-underscore-to-camel-case: true
2.2 注解模式 参考官方:https://github.com/mybatis/spring-boot-starter/wiki/Quick-Start
使用注解模式编写SQL语句,避免了为每个Mapper编写映射文件。
常用的注解:@Select、@Insert、@Update、@ Delete
具体使用方式可以参考:MyBatis注解模式
案例:
1
2
3
4
5
@Mapper public interface CityMapper @Select("select * from city where id=#{id}") public City getById (Long id)
2.3 混合模式 混合使用注解和配置文件两种方式。
1 2 3 <insert id ="indert" useGenerateKeys ="true" keyProperty ="id" > </insert >
insert语句中的useGenerateKeys属性,能够确保类似id这种自增主键插入数据库后,也能够返回到参数city中。
以上代码使用注解方式为:
1
2
3
@Insert("insert into city(`name`,`state`,`country`) values(#{name},#{state},#{country})") @Options(useGeneratedKeys = true,keyProperty = "id") public void insert (City city)
最佳实践:
三、整合MyBatis-Plus 3.1 什么是MyBatis-Plus MyBatis-Plus 是MyBatis的一个增强工具,在MyBatis的基础上只做增强不做改变,简化开发。
3.2 整合MyBatis-Plus 1、引入starter
1 2 3 4 5 6 <dependency > <groupId > com.baomidou</groupId > <artifactId > mybatis-plus-boot-starter</artifactId > <version > 3.4.1</version > </dependency >
MyBatis-Plus的starter自动帮我们引入了JDBC、MyBatis、MyBatis-Spring等依赖包,因此如果使用MyBatis-Plus则不必单独这些依赖。
2、分析starter,查看配置信息
分析其自动配置类可知,可以通过mybatis-plus对其进行配置。
为我们配置好了SqlSessionFactory,数据源是容器中默认的数据源。
自动配置了mapperLocations,默认值为classpath*:/mapper/**/*.xml,即任意包的类路径(编译之后的路径)下的所有mapper文件夹中任意路径的xml文件,都作为映射文件。因此建议以后的映射文件放在mapper目录下面。
@Mapper标注的接口,也会被自动扫描,不需要再配置。建议还是使用@MapperScan注解批量扫描。
3、使用MyBatis-Plus
MyBatis-Plus为我们提供了BaseMapper接口,其定义了大部分的增删查改操作。我们只需要在接口上继承BaseMapper即可,不需要写任何方法,无需写映射文件 ,使用的时候直接调用BaseMapper中的方法。
UserMapper.java接口
1 public interface UserMapper extends BaseMapper <User >
如果我们要编写service层,是否要实现BaseMapper中的所有方法?MyBatis-Plus也为我们提供了一个service层的接口IService,这是顶级service,其定义了常用的service层方法。
并且,MyBatis-Plus还为我们提供了IService的实现类ServiceImpl,我们的实现类只需要继承它即可,同样也不需要重写方法。
UserService.java
1 public interface UserService extends IService <User >
UserServiceImpl.java
1
2
3
@Service public class UserServiceImpl extends ServiceImpl <UserMapper , User > implements UserService {}
一般@Service\@Repository之类的注解使用在类上。@Autowired可以用在接口上
这样,我们就可以直接调用方法进行使用了。
使用MyBatis-Plus,为我们省去了配置映射文件,手动实现CRUD操作的步骤。
其他说明
@TableName注解和@TableField注解:
@TableName :可以用来指定要查找的表。因为MyBatis-Plus默认对和Mapper接口名相同的表 进行操作。TableField:MyBatis-Plus默认要求实体类的属性必须都在表中存在,如果某个属性不在表中,可以使用这个注解进行标注。
1 2 3 4 5 6 @TableName("user") public class User @TableField(exist = false) private String userName;
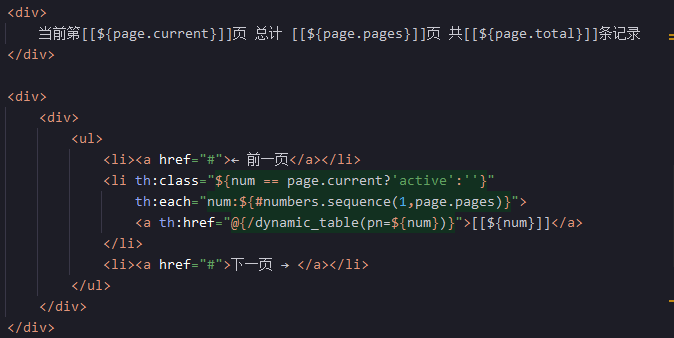
3.3 分页功能 MyBatis-Plus为我们提供了分页插件 ,我们可以使用它完成分页功能。
首先需要将MybatisPlusInterceptor这个组件设置参数,并注入容器。
1
2
3
4
5
6
7
8
9
10
11
12
13
14
15
16
17
18
@Configuration public class MybatisPlusConfig @Bean public MybatisPlusInterceptor mybatisPlusInterceptor () new MybatisPlusInterceptor();new PaginationInnerInterceptor();true );100L );return interceptor;
然后在controller中获取Page类对象,实现分页功能。
1
2
3
4
5
6
7
8
9
10
11
12
13
14
15
16
17
18
19
20
21
22
23
24
25
26
27
28
29
30
31
32
33
34
35
36
37
38
39
40
41
@Controller public class TableController @Autowired @GetMapping("/dynamic_table") public String dynamic_table (@RequestParam(value = "pn",defaultValue = "1") Integer pn, Model model) new Page<>(pn, 2 ); null );"page" ,page);return "table/dynamic_table" ;@GetMapping("/user/delete/{id}") public String deleteUser (@PathVariable("id") Long id, @RequestParam(value="pn",defaultValue="1") Integer pn, RedirectAttributes ra) "pn" ,pn);return "redirect:/dynamic_table" ;
前端页面从Page对象中取数据,并分页显示:


