一、MyBatis介绍 MyBatis是一款优秀的持久层框架,它支持自定义 SQL、存储过程以及高级映射。MyBatis 免除了几乎所有的 JDBC 代码以及设置参数和获取结果集的工作。MyBatis 可以通过简单的XML 或注解 来配置和映射原始类型、接口和 Java POJO(Plain Old Java Objects,普通老式 Java 对象)为数据库中的记录。
总结:MyBatis使用XML 或注解 替代了传统的DAO实现,开发人员只需要关注SQL语句的编写,不需要花费大量代码去获取数据库连接和处理结果集。
官方文档:https://mybatis.org/mybatis-3/zh/index.html
表现层、业务层、持久层三层框架。
二、MyBatis实现CRUD 使用环境 :
IDEA Ultimate 2020.3
MyBatis 3.4.6
MySQL 5.1.47
Maven 3.8.1
练习代码参考:Mybatis_study
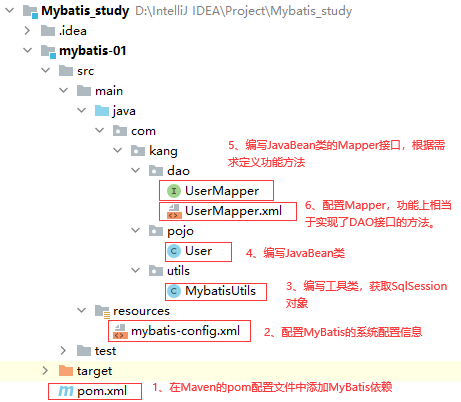
2.1 基本步骤 Maven项目中使用MyBatis的大致步骤,和常用的文件目录结构如图:
Maven项目中配置MyBatis
2.2 步骤详情 2.2.1 pom文件配置 要使用MyBatis,首先需要导入其jar包,在mvnrepository 网站找到MyBatis依赖,将其放入Maven配置文件中的依赖中即可。同时还需要导入MySQL依赖,其余的根据需求导入。
pom.xml文件是Maven项目的配置文件,其配置了项目的组id,部署id,版本号,依赖包等内容。
这里将Mybatis_study作为父工程,其中包括了多个子模块,只需要在父工程的配置文件中添加依赖,子模块的pom.xml就不再需要额外引入依赖了。
父工程的pom.xml文件
1
2
3
4
5
6
7
8
9
10
11
12
13
14
15
16
17
18
19
20
21
22
23
24
25
26
27
28
29
30
31
32
33
34
35
36
37
38
39
40
41
42
43
44
45
46
47
48
49
50
51
52
53
54
55
56
57
58
59
60
61
62
63
64
65
66
67
68
69
70
71
72
73
74
75
76
77
78
<?xml version="1.0" encoding="UTF-8"?> <project xmlns ="http://maven.apache.org/POM/4.0.0" xmlns:xsi ="http://www.w3.org/2001/XMLSchema-instance" xsi:schemaLocation ="http://maven.apache.org/POM/4.0.0 http://maven.apache.org/xsd/maven-4.0.0.xsd" > <modelVersion > 4.0.0</modelVersion > <groupId > com.kang</groupId > <artifactId > Mybatis_study</artifactId > <version > 1.0-SNAPSHOT</version > <modules > <module > mybatis-01</module > <module > mybatis-02</module > <module > mybatis-03</module > </modules > <properties > <maven.compiler.source > 15</maven.compiler.source > <maven.compiler.target > 15</maven.compiler.target > </properties > <packaging > pom</packaging > <dependencies > <dependency > <groupId > org.mybatis</groupId > <artifactId > mybatis</artifactId > <version > 3.4.6</version > </dependency > <dependency > <groupId > mysql</groupId > <artifactId > mysql-connector-java</artifactId > <version > 5.1.47</version > </dependency > <dependency > <groupId > junit</groupId > <artifactId > junit</artifactId > <version > 4.12</version > <scope > test</scope > </dependency > <dependency > <groupId > log4j</groupId > <artifactId > log4j</artifactId > <version > 1.2.17</version > </dependency > </dependencies > <build > <resources > <resource > <directory > src/main/java</directory > <includes > <include > **/*.properties</include > <include > **/*.xml</include > </includes > <filtering > false</filtering > </resource > <resource > <directory > src/main/resources</directory > <includes > <include > **/*.properties</include > <include > **/*.xml</include > </includes > <filtering > false</filtering > </resource > </resources > </build > </project >
因为Maven在编译时,默认只会将resource目录下的配置文件添加到target/classes文件夹下,如果使用了Mapper配置文件,则需要在Maven配置文件中使用<resources>标签,使Maven编译时将指定目录下的配置文件也拷贝到target/classes文件夹下。
另一种做法是,在resource目录下,创建和DAO接口相同的目录,将配置文件添加到这个目录下。
项目中这些路径,都是编译后的文件所在的位置,所以原则是保证编译后,能够根据代码中写的路径找到相应的文件。
Maven会将resource目录下的配置文件编译到target/classes目录下,将java目录下的文件也编译到target/classes目录。
如果resource目录下存在一个和java目录相同的子目录,编译后,这两个目录中的内容都会存放在target/classes的同一个目录中,这个路径就是原来的相同的子目录(就是说两个相同的子目录编译后只会存在一个)
2.2.2 MyBatis配置文件 mybatis-config.xml配置文件位于resource文件目录下,其包含了对MyBatis系统的核心设置,包括获取数据库连接实例的数据源(DataSource)以及决定事务作用域和控制方式的事务管理器(TransactionManager)等。
mybatis-config.xml的简单示例:
1
2
3
4
5
6
7
8
9
10
11
12
13
14
15
16
17
18
19
20
21
22
23
<?xml version="1.0" encoding="utf-8"?> <!DOCTYPE configuration PUBLIC "-//mybatis.org//DTD Config 3.0//EN" "http://mybatis.org/dtd/mybatis-3-config.dtd" > <configuration > <environments default ="development" > <environment id ="development" > <transactionManager type ="JDBC" /> <dataSource type ="POOLED" > <property name ="driver" value ="com.mysql.jdbc.Driver" /> <property name ="url" value ="jdbc:mysql://localhost:3306/mybatis?characterEncoding=UTF-8& serverTimezone=UTC" /> <property name ="username" value ="root" /> <property name ="password" value ="123456" /> </dataSource > </environment > </environments > <mappers > <mapper resource ="com/kang/dao/UserMapper.xml" /> </mappers > </configuration >
MyBatis的XML配置文件的按照严格的结构配置,配置文件中的标签书写顺序要严格按照下面的顺序。参考MyBatis官方文档:
2.2.3 获取SqlSession对象 使用MyBatis实现CRUD操作,主要是通过SqlSession对象进行的,其类似于传统JDBC中的数据库Connection对象。MyBatis中使用Mapper 的概念替换了DAO的概念。
获取SqlSession对象的主要过程如下:
通过SqlSessionFactoryBuilder对象获取SqlSessionFactory对象。(建造者模式)
通过SqlSessionFactory对象获取SqlSession对象。(工厂模式)
通过SqlSession对象生成相应的Mapper实现类对象。
通过Mapper实现类对象调用Mapper中的方法实现CRUD操作。
在java/com/kang/utils路径下,创建MybatisUtils工具类,用户获取SqlSession对象:
1
2
3
4
5
6
7
8
9
10
11
12
13
14
15
16
17
18
19
20
21
22
23
24
25
26
27
28
29
package com.kang.utils;import org.apache.ibatis.io.Resources;import org.apache.ibatis.session.SqlSession;import org.apache.ibatis.session.SqlSessionFactory;import org.apache.ibatis.session.SqlSessionFactoryBuilder;import java.io.IOException;import java.io.InputStream;public class MybatisUtils private static SqlSessionFactory sqlSessionFactory;static {"mybatis-config.xml" ;null ;try {catch (IOException e) {new SqlSessionFactoryBuilder().build(inputStream);public static SqlSession getSqlSession () return sqlSessionFactory.openSession();
关于SqlSessionFactoryBuilder、SqlSessionFactory、SqlSession对象的生命周期
SqlSessionFactoryBuilder:一旦创建了 SqlSessionFactory,就不再需要SqlSessionFactoryBuilder了。 因此它的最佳作用域是方法作用域(也就是局部方法变量) 。 可以重用 SqlSessionFactoryBuilder 来创建多个 SqlSessionFactory 实例,但最好还是不要一直保留着它,以保证所有的 XML 解析资源可以被释放给更重要的事情。SqlSessionFactory:SqlSessionFactory 一旦被创建就应该在应用的运行期间一直存在 ,没有任何理由丢弃它或重新创建另一个实例。 使用 SqlSessionFactory 的最佳实践是在应用运行期间不要重复创建多次,因此 SqlSessionFactory 的最佳作用域是应用作用域 。 有很多方法可以做到,最简单的就是使用单例模式 或者静态单例模式 。SqlSession:每个线程都应该有自己的 SqlSession 实例。SqlSession 的实例不是线程安全的,因此是不能被共享的,所以它的最佳的作用域是请求或方法作用域 。 绝对不能将 SqlSession 实例的引用放在一个类的静态域,甚至一个类的实例变量也不行。 也绝不能将 SqlSession 实例的引用放在任何类型的托管作用域中,比如 Servlet 框架中的 HttpSession。 如果现在正在使用一种 Web 框架,考虑将 SqlSession 放在一个和 HTTP 请求相似的作用域中。 换句话说,每次收到 HTTP 请求,就可以打开一个 SqlSession,返回一个响应后,就关闭它 。 这个关闭操作很重要,为了确保每次都能执行关闭操作,应该把这个关闭操作放到 finally 块中。
2.2.4 编写Bean类和Mapper接口 创建pojo或bean目录,然后在其中创建JavaBean类,比如User类:
1
2
3
4
5
6
7
8
9
10
11
12
13
14
15
16
17
18
19
20
21
22
23
24
25
26
27
28
29
30
31
32
33
34
35
36
37
package com.kang.pojo;public class User private int id;private String name;private String pwd;public User () public User (int id, String name, String pwd) this .id = id;this .name = name;this .pwd = pwd;public int getId () return id;}public void setId (int id) this .id = id;}public String getName () return name;}public void setName (String name) this .name = name;}public String getPwd () return pwd;}public void setPwd (String pwd) this .pwd = pwd;}@Override public String toString () return "User{" +"id=" + id +", name='" + name + '\'' +", pwd='" + pwd + '\'' +'}' ;
创建dao目录,在其中编写User类对应的Mapper接口,定义一些操作。比如UserMapper:
1
2
3
4
5
6
7
8
9
10
11
12
13
14
15
16
17
18
19
20
21
22
23
24
25
package com.kang.dao;import com.kang.pojo.User;import java.util.List;import java.util.Map;public interface UserMapper List<User> getUserList () ;User getUserById (int id) ;int addUser (User user) int updateUser (User user) int deleteUser (int id)
2.2.5 Mapper配置文件 传统JDBC需要对每个DAO接口创建一个实现类,以供service层使用。在MyBatis中,对每个Mapper接口创建一个配置文件即可,甚至可以不需要Mapper映射文件,直接在Mapper接口中使用注解功能,执行相应的SQL语句。
这里先讨论Mapper映射文件的配置。
创建UserMapper.xml映射文件,内容如下:
1
2
3
4
5
6
7
8
9
10
11
12
13
14
15
16
17
18
19
20
21
22
23
24
25
26
27
28
29
30
31
32
<?xml version="1.0" encoding="utf-8"?> <!DOCTYPE mapper PUBLIC "-//mybatis.org//DTD Mapper 3.0//EN" "http://mybatis.org/dtd/mybatis-3-mapper.dtd" > <mapper namespace ="com.kang.dao.UserMapper" > <select id ="getUserList" resultType ="com.kang.pojo.User" > </select > <select id ="getUserById" resultType ="com.kang.pojo.User" > </select > <insert id ="addUser" parameterType ="com.kang.pojo.User" > </insert > <update id ="updateUser" parameterType ="com.kang.pojo.User" > </update > <delete id ="deleteUser" > </delete > </mapper >
上述映射文件,实现了Mapper接口中每个方法的功能。每个映射文件,都需要写到MyBatis配置文件(即mybatis-config.xml)的<mapper>标签中进行绑定。
2.2.6 执行CRUD语句 在以上几步都完成以后,就可以编写代码实施具体的操作,主要步骤为:
从工具类中获取SqlSession对象。
调用SqlSession类的getMapper()方法获取Mapper接口的一个实现类对象。
根据获取的Mapper实现类对象,调用具体的方法完成操作。
关闭SqlSession。
以查询和添加用户为例
1 2 3 4 5 6 7 8 9 10 11 12 13 14 15 16 17 18 19 20 21 22 23 24 25 26 27 28 29 30 31 32 33 34 35 36 37 38 39 40 41 @Test public void getUserList () null ;try {for (User user : userList) {catch (Exception e) {finally {if (sqlSession != null ){@Test public void addUser () null ;try {new User(1 , "test" , "test" ));catch (Exception e) {finally {if (sqlSession != null ){
这样,使用MyBatis进行CRUD的基本流程就大致完成了,下面讨论其中的详细配置和要注意的问题。
三、XML映射文件 Mapper映射文件中,一共有9个顶级元素,每个顶级元素有自己的参数配置,可以参考官方文档-XML映射器
cache – 该命名空间的缓存配置。cache-ref – 引用其它命名空间的缓存配置。resultMap – 结果映射,描述如何从数据库结果集中加载对象,是最复杂也是最强大的元素。parameterMap – 参数映射。已被废弃,将来可能被移除,建议使用行内参数映射。sql – 可被其它语句引用的可重用语句块。类似于JSP中的common元素,在别的语句中通过include标签引入,提高代码可重用性。insert – 映射插入语句。update – 映射更新语句。delete – 映射删除语句。select – 映射查询语句。
3.1 一些参数说明 select元素的参数和insert/update/delete参数有区别。下面重点说明几个重要的参数。
id:命名空间中唯一的标识符,可以被用来引用这条语句,值为Mapper接口的方法名resultType:select元素特有。 期望从这条语句中返回结果的类全限定名或别名。 如果返回的是集合,那应该设置为集合包含的类型,而不是集合本身的类型。 resultType 和 resultMap 之间只能同时使用一个。resultMap:select元素特有。 对外部 resultMap 的命名引用。结果映射是 MyBatis 最强大的特性。parameterType:将会传入这条语句的参数的类全限定名或别名。这个属性是可选的,因为MyBatis 可以通过类型处理器(TypeHandler)推断出具体传入语句的参数,默认值为未设置(unset)。
关于parameterType的@Param
参考自:http://www.mybatis.cn/archives/920.html
1、简单类型不需要设置parameterType。
2、复杂的参数类型需要设置parameterType,比如传入一个对象时,需要使用,比如:
1 2 3 4 <insert id ="insertUser" parameterType ="User" > </insert >
此时,User 类型的参数对象传递到了语句中,会查找 id、username 和 password 属性,然后将它们的值传入预处理语句的参数中。
此外,parameterType的值还可以使用map(这里是别名)传递,表示参数类型是Map,参数的名称为Map中的key:
1 2 3 4 5 <select id ="selectUsers" resultType ="User" parameterType ="map" > </select >
3、复杂类型也可以使用@Param的方式,此时不需要设置parameterType。
Mapper接口中:
1 public List<Users > getUsers(@Param("name") String name, @Param("age") int age);
映射文件中的语句:
1 2 3 4 5 <select id ="selectUsers" resultType ="User" > </select >
使用@Param注解的方式,不需要设置参数类型,参数名称为注解定义的名称,这种方式只适用于参数较少的情况。
3.2 结果映射 resultMap用于对结果集进行映射。其和resultType只能同时一个。简单情况下,可以直接使用resultType="map"实现简单的映射,比如:
1 2 3 4 5 <select id ="getUserById" resultType ="map" > </select >
这种情况下,语句简单地将所有的列映射到 HashMap 的键上,这由 resultType 属性指定。虽然在大部分情况下都够用,但是 HashMap 并不是一个很好的领域模型。实际情况下更可能会使用 JavaBean 或POJO(Plain Old Java Objects)作为resultType,比如:
1 2 3 4 5 <select id ="getUserById" resultType ="com.kang.pojo.User" > </select >
对于一些复杂情况,比如联表查询,或者属性名和表字段名不一致时,必须使用resultMap进行映射。
3.2.1 使用resultMap解决列名和属性名不一致问题 对于User表,数据库中属性是id,name,pwd,而Javabean中属性为id,name,password。二者的密码属性名称不一致,会导致查出来结果为null。
其中一种解决方法是在SQL语句中给列名起别名,使其和属性名保持一致:
1 2 3 4 5 <select id ="getUserById" resultType ="com.kang.pojo.User" > </select >
第二个方法是使用resultMap进行结果集映射:
1 2 3 4 5 6 7 8 9 10 <select id ="getUserById" parameterType ="int" resultMap ="UserMap" > </select > <resultMap id ="UserMap" type ="com.kang.pojo.User" > <result column ="id" property ="id" /> <result column ="name" property ="name" /> <result column ="pwd" property ="password" /> </resultMap >
resultMap中有两个重要的参数,主要用于多表查询:
association:一个复杂类型的关联 ;许多结果将包装成这种类型。用于一对一或多对一 查询,查询结果是对于一个对象时使用。比如多个学生和同一个老师关联。collection:一个复杂类型的集合 。用于一对多或多对多 查询,查询结果是多个对象时使用。比如一个老师和多个不同的学生的关系,查询一个老师教的多个不同的学生,应该使用collection。
其他标签和属性,比如:
id标签: 将一个列的值映射到一个简单数据类型的属性或字段。id元素对应的属性会被标记为对象的标识符,在比较对象实例时使用。 这样可以提高整体的性能,尤其是进行嵌套结果映射的时候。result标签:也是将一个列的值映射到一个简单数据类型的属性或字段。column属性:数据库中的列名,或者是列的别名。类似于resultSet.getString(columnName) 方法的参数。property属性:映射到列结果的Java类中的字段或属性。如果用来匹配的 JavaBean 存在给定名字的属性,那么它将会被使用。否则 MyBatis 将会寻找给定名称的字段。
3.2.2 N对1查询 如果多个表,例如两个表进行一对一或者多对一查询,就需要使用resultMap,具体来说是使用resultMap的association 。
比如,多个学生对应一个老师,类定义如下:
Student.java:
1
2
3
4
5
6
public class Student private int id;private String name;private Teacher teacher;
StudentMapper:
1
2
3
4
5
public interface StudentMapper List<Student> getStudent () ;
teacher.java:
1
2
3
4
5
public class Teacher private int id;private String name;
假设当前数据库中,所有的学生的老师都是同一位,即多对一的情况,有两种查询方式,第一种类似于子查询,第二种是结果嵌套(常用)。
查询语句如下:
1 2 3 4 5 6 7 8 9 10 11 12 13 14 15 16 17 18 19 20 21 22 23 24 25 26 27 28 29 30 31 32 33 34 35 36 37 38 39 40 41 42 43 <select id ="getStudent" resultMap ="StudentTeacher" > </select > <resultMap id ="StudentTeacher" type ="com.kang.pojo.Student" > <result property ="id" column ="id" /> <result property ="name" column ="name" /> <association property ="teacher" column ="tid" javaType ="com.kang.pojo.Teacher" select ="getTeacherName" /> </resultMap > <select id ="getTeacherName" resultType ="com.kang.pojo.Teacher" > </select > <select id ="getStudent2" resultMap ="StudentTeacher2" > </select > <resultMap id ="StudentTeacher2" type ="com.kang.pojo.Student" > <id property ="id" column ="sid" /> <result property ="name" column ="sname" /> <association property ="teacher" javaType ="com.kang.pojo.Teacher" > <id property ="id" column ="tid" /> <result property ="name" column ="tname" /> </association > </resultMap >
3.2.3 N对多查询 一个老师对应多个学生,查询老师和其学生,就是一对多/多对多的问题。
Teacher.java
1
2
3
4
5
6
public class Teacher private int id;private String name;private List<Student> students;
TeacherMapper
1
2
3
4
public interface TeacherMapper Teacher getTeacherById (int id) ;
Student.java
1
2
3
4
5
6
public class Student private int id;private String name;private int tid;
多对多和一对多的查询是相似地,都是使用collection,同样有两种方式:
1 2 3 4 5 6 7 8 9 10 11 12 13 14 15 16 17 18 19 20 21 22 23 24 25 26 27 28 29 30 31 32 33 34 35 36 37 38 39 40 <select id ="getTeacherById" resultMap ="getTeacherStudent" > </select > <resultMap id ="getTeacherStudent" type ="com.kang.pojo.Teacher" > <id property ="id" column ="tid" /> <result property ="name" column ="tname" /> <collection property ="students" ofType ="com.kang.pojo.Student" > <id property ="id" column ="sid" /> <result property ="name" column ="sname" /> <result property ="tid" column ="stid" /> </collection > </resultMap > <select id ="getTeacherById2" resultMap ="getTeacherStudent2" > </select > <resultMap id ="getTeacherStudent2" type ="com.kang.pojo.Teacher" > <id property ="id" column ="id" /> <result property ="name" column ="name" /> <collection property ="students" column ="id" javaType ="List" ofType ="com.kang.pojo.Student" select ="getStudentsByTid" /> </resultMap > <select id ="getStudentsByTid" resultType ="com.kang.pojo.Student" > </select >
注意到,在association和collection标签中,出现了ofType和javaType两种类型,二者都是用来指定对象类型的,区别如下:
javaType用来指定pojo类中属性的类型,如果property标签的值不是集合,就使用javaType。一般用于association标签中。
比如N对一查询中,Student类中的teacher属性,只是一个对象,不是集合,类型是Teacher类,因此使用javaType,值为com.kang.pojo.Teacher。
在N对多的查询中,Teacher类中的students属性,是一个List类型,因此其值为List。
ofType用来指定集合中存储元素的类型。当property标签的值是集合的时候使用ofType,值为集合中元素的类型。
比如在N对多查询中,Teacher类中的students属性,是一个List类型,List中的元素类型是Student类型,因此ofType="com.kang.pojo.Student"。
四、注解 4.1 使用方法 前面说过,MyBatis有两种方式实现SQL语句,可以通过XML映射文件实现SQL语句,也可以使用注解的方式,直接在Mapper接口的方法上用注解:
1
2
@Select("select * from user where ${column} = #{value}") User findByColumn (@Param("column") String column, @Param("value") String value) ;
其中@Param为参数注解,指定参数的值应该对应到SQL语句中的哪个参数。
上述使用注解的方法不需要XML映射文件,使用时直接传入参数即可:
1
2
3
User userOfId1 = userMapper.findByColumn("id" , 1L );"name" , "kid" );"email" , "noone@nowhere.com" );
其中 ${column} 会被直接替换,而 #{value} 会使用 ? 预处理,从而实现根据不同列查询。
但是使用${}存在SQL注入的问题。
关于@Param注解 :
其和parameterType的对比可以参考3.1节的内容。
@Param注解的作用是给参数命名,命名后的参数可以根据名字将其值传入到SQL语句中,一般使用#{}的方式。
如果方法有多个参数,如果使用参数注解,则每个参数都必须使用@Param注解。只有一个参数时可以不用写@Param注解,但建议加上。
SQL语句中参数#{name}取的就是@Param{"name"}中的name。
在不使用@Param注解的时候,函数的参数只能为一个,并且在查询语句取值时只能用#{}。如果想传递多个参数,parameterType参数类型为map(此处为别名,对应类型为Map)或者为JavaBean类。
而使用@Param注解则可以使用多个参数,无需再设置parameterType,并且在查询语句中使用时可以使用#{}或者${}。
4.2 ${} 和 #{}的区别 ${}和#{}是两种取变量的方式,二者的区别如下:
${}是 Properties 文件中的变量占位符,它可以用于标签属性值和 sql 内部,属于静态文本替换。
比如${driver}会被静态替换为com.mysql.jdbc.Driver。
使用${}存在SQL注入的问题。
#{}是 sql 的参数占位符,MyBatis 会将 sql 中的#{}预编译为?号,在 sql 执行前会使用PreparedStatement的参数设置方法,按序给SQL语句的?号占位符设置参数值。#{}没有SQL注入的问题。
五、动态SQL 动态SQL能够根据不同的条件自动拼接SQL语句,MyBatis中借用OGNL(对象图导航语言)的表达式实现动态SQL。主要有以下四种元素:
if choose ( when, otherwise ) trim ( where, set ) foreach
5.1 if 使用if可以根据条件判断是否要添加条件:
1 2 3 4 5 6 7 8 9 <select id ="queryBlogIf" resultType ="com.kang.pojo.Blog" > <if test ="title != null" > </if > <if test ="author != null" > </if > </select >
根据传入的参数,判断是否满足对应的条件,如果满足条件,会将语句加上。
这里的模糊查询,使用了concat函数,能够防止SQL注入。同时参数只需要传入value值即可,否则参数中还需要传入%。
5.2 choose、when、otherwise if条件只要满足,就会使用,如果只想使用一个条件,可以使用choose结构:
1 2 3 4 5 6 7 8 9 10 11 12 13 14 15 <select id ="findActiveBlogLike" resultType ="Blog" > <choose > <when test ="title != null" > </when > <when test ="author != null" > </when > <otherwise > </otherwise > </choose > </select >
choose最多只会匹配一个条件,即使有多个条件满足,也只会从上到下匹配到最先满足条件的语句。
otherwise表示如果所有的when条件没有一个满足的,则使用otherwise中的语句。
5.3 trim、where、set 以上条件的where是固定的,如果将where改为动态的,就需要考虑一个问题,即条件中的and什么时候添加,或者where改写在哪个条件中。
使用where可以完美解决这个问题:
1 2 3 4 5 6 7 8 9 10 11 12 13 14 15 <select id ="findActiveBlogLike" resultType ="Blog" > <where > <if test ="state != null" > </if > <if test ="title != null" > </if > <if test ="author != null and author.name != null" > </if > </where > </select >
where 元素只会在子元素返回任何内容的情况下才插入 “WHERE” 子句。而且,若子句的开头为 “AND” 或 “OR”,where 元素也会将它们去除。
同样地,set元素可以用于”INSERT”中动态插入:
1 2 3 4 5 6 7 8 9 10 <update id ="updateAuthorIfNecessary" > <set > <if test ="username != null" > username=#{username},</if > <if test ="password != null" > password=#{password},</if > <if test ="email != null" > email=#{email},</if > <if test ="bio != null" > bio=#{bio}</if > </set > </update >
set元素会动态地在行首插入”SET”关键字,并会删掉额外的逗号。
where和set都可以看作是trim的特例。
其中上述的where用trim元素写为:
1 2 3 4 <trim prefix ="WHERE" prefixOverrides ="AND |OR " > </trim >
prefixOverrides属性会忽略通过管道符分隔的文本序列(空格是必要的)。上述例子会移除所有 prefixOverrides属性中指定的内容,并且插入 prefix属性中指定的内容。
上述的set用trim元素写为:
1 2 3 <trim prefix ="SET" suffixOverrides ="," > </trim >
5.4 foreach foreach用于对集合进行遍历,比如IN条件语句:
1 2 3 4 5 6 7 8 9 <select id ="selectPostIn" resultType ="domain.blog.Post" > <foreach item ="item" index ="index" collection ="list" open ="(" separator ="," close =")" > </foreach > </select >
其中item表示本次迭代的项,index表示索引,collection表示集合对象,这里为list,可以传入List、Map、SET等任何可迭代对象。
上述语句对应的SQL语句为:SELECT * FROM POST P WHERE ID in (?,?,...,?),其中参数的个数为集合中项的个数。
5.5 script 在带注解的映射器接口类中使用动态SQL,可以使用script元素,比如:
1
2
3
4
5
6
7
8
9
10
11
@Update({"<script>", "update Author", " <set>", " <if test='username != null'>username=#{username},</if>", " <if test='password != null'>password=#{password},</if>", " <if test='email != null'>email=#{email},</if>", " <if test='bio != null'>bio=#{bio}</if>", " </set>", "where id=#{id}", "</script>"}) void updateAuthorValues (Author author)
六、MyBatis缓存 MyBatis的缓存分为一级缓存(本地缓存) 和二级缓存 :
一级缓存 :作用域为一个SqlSession域,即一次请求。默认开启。SqlSession关闭后,一级缓存的内容会存放到二级缓存 。
比如,同一个SqlSession中,对象中有一个HashMap存放缓存数据。第一次查询操作执行完毕后,会将查询到的数据写到缓存,第二次尝试从缓存中获取数据,如果能够命中,则没必要去查询数据库,可以提高效率。
二级缓存 :作用域是整个namespace,即同一个命名空间的所有SqlSession共享二级缓存。默认关闭。
如果两个SqlSession执行相同的查询操作,第二次会直接从二级缓存中获取数据,避免了从数据库中查询。
查询缓存过程 :第一次查询时,回去缓存中查找数据,如果没有,则查询数据库,然后将查询的数据放入一级缓存。之后的同一个SqlSession域(类似于同一个请求)中的相同查询能够命中缓存,从缓存中获取数据。当SqlSession关闭时,将一级缓存的内容放入二级缓存。
开启二级缓存,需要在MyBatis核心配置文件的<settings>元素中,设置:
1 2 3 4 <setting name ="cacheEnabled" value ="true" />
然后在XML映射文件中加入:
1 2 3 4 5 <cache eviction ="FIFO" flushInterval ="6000" size ="512" readOnly ="true" />
也可以单独为某个方法开启是否使用缓存。
开启二级缓存后,还需要将要缓存的pojo实现Serializable接口,为了将缓存数据取出执行反序列化操作,因为二级缓存数据存储介质多种多样,不一定只存在内存中,有可能存在硬盘中。
二级缓存可用的清除策略有:
LRU – 最近最少使用:移除最长时间不被使用的对象。(默认策略)FIFO – 先进先出:按对象进入缓存的顺序来移除它们。SOFT – 软引用:基于垃圾回收器状态和软引用规则移除对象。WEAK – 弱引用:更积极地基于垃圾收集器状态和弱引用规则移除对象。
insert/delete/update 语句的flushCache参数默认为true,意味着这几种语句会自动刷新缓存。
二级缓存是事务性的。这意味着,当 SqlSession 完成并提交时,或是完成并回滚,但没有执行DML语句时,缓存也会获得更新。
七、日志 Mybatis 通过使用内置的日志工厂提供日志功能。内置日志工厂将会把日志工作委托给下面的实现之一:
SLF4J
Apache Commons Logging
Log4j 2
Log4j
JDK logging
MyBatis 内置日志工厂会基于运行时检测信息选择日志委托实现。它会(按上面罗列的顺序)使用第一个查找到的实现。当没有找到这些实现时,将会禁用日志功能。
可以在MyBatis核心配置文件的<settings>元素中,开启日志工厂,比如log4j:
1 2 <setting name ="logImpl" value ="LOG4J" />
使用log4j的前提是需要导入其jar包,在Maven配置文件中导入log4j的依赖。
使用log4j需要使用配置文件,在resources文件夹中创建log4j.preperties配置文件,配置log4j的具体信息。可以参考log4j官方文档:https://logging.apache.org/log4j/2.x/javadoc.html
一个可供参考的log4j配置文件:
1 2 3 4 5 6 7 8 9 10 11 12 13 14 15 16 17 18 19 20 21 22 23 24 25 26 27 28 29 30 31 32 33 34 35 36 37 38 39 40 41 42 43 44 45 46 47 48 log4j.rootLogger =DEBUG,console,file log4j.appender.console =org.apache.log4j.ConsoleAppender log4j.appender.console.Target =System.out log4j.appender.console.Threshold =DEBUG log4j.appender.console.layout =org.apache.log4j.PatternLayout log4j.appender.console.layout.ConversionPattern =[%c]-%m%n log4j.appender.file =org.apache.log4j.RollingFileAppender log4j.appender.file.File =./log/kang.log log4j.appender.file.Append =true log4j.appender.file.MaxFileSize =10MB log4j.appender.file.Threshold =DEBUG log4j.appender.file.layout =org.apache.log4j.PatternLayout log4j.appender.file.layout.ConversionPattern =[%p][%d{yy-MM-dd}][%c]%m%n log4j.logger.org.mybatis =DEBUG log4j.logger.java.sql =DEBUG log4j.logger.java.sql.Statement =DEBUG log4j.logger.java.sql.ResultSet =DEBUG log4j.logger.java.sql.PreparedStatement =DEBUG
八、其他问题 参考JavaGuide

 Maven项目中配置MyBatis