
Nginx安装与配置
一、安装Nginx
环境:
- CentOS 7.9
- Nginx 8.45
安装步骤:
1、首先需要确保系统已经安装了编译工具和库文件,可以使用yum命令安装:
1 | |
2、需要PCRE的支持
Nginx的安装需要PCRE的支持,PCRE的作用是让Nginx支持Rewrite功能。安装PCRE的步骤如下:
可以手动去官网下载安装包,或者使用
wget命令下载:首先进入
/usr/src/目录,将pcre下载到这个目录1
2[root@localhost /]# cd /usr/src/
[root@localhost src]# wget https://sourceforge.net/projects/pcre/files/pcre/8.45/pcre-8.45.tar.gz/download解压文件
1
[root@localhost src]# tar -zxvf download解压后进入安装包目录
1
[root@localhost src]# cd pcre-8.45/执行
configure文件,编译并安装1
2[root@localhost pcre-8.45]# ./configure
[root@localhost pcre-8.45]# make && make install查看版本号,安装成功
1
2[root@localhost pcre-8.45]# pcre-config --version
8.45
3、安装Nginx
手动下载,或者使用wget下载安装包。
同样在/usr/src/目录下下载安装包:
1 | |
然后解压:
1 | |
解压完后,进入nginx-1.20.1文件夹中,执行configure文件:
1 | |
编译并安装:
1 | |
安装完成后,在/usr/local/目录会生成nginx的安装包:
1 | |
4、启动并测试Nginx
在/usr/local/nginx/sbin目录下就包括了Nginx的启动脚本。直接执行脚本即可启动Nginx服务:
1 | |
在/usr/local/nginx/conf/目录下包括了各种配置文件,其中nginx.conf为nginx的配置文件,里面配置了Nginx的默认监听端口为80,我们可以使用curl命令访问测试:
1 | |
可以看到,返回了html页面的内容,说明安装成功,并能够连接到Nginx。
5、修改端口号
默认情况下,由于防火墙限制,外界是无法直接访问Linux中Nginx的,有两个解决方法:
关闭Linux的防火墙。
开放访问的端口号,不需要关闭防火墙。
查看开放的端口号:
1
firewall-cmd --list-all设置要开放的端口号:
1
2# 将80端口开放,并使其永久生效
firewall-cmd --add-port=80/tcp --permanent重启防火墙即可生效。
1
firewall-cmd --reload或者使用:
1
systemctl restart firewalld.service
这样,即使不关闭防火墙,外界也能通过地址访问到Nginx。
二、常用命令
如果不配置环境变量,则使用Nginx命令需要在按照目录下面的sbin/目录中使用,即/usr/local/nginx/sbin/目录里面。
1、查看Nginx的版本号:
1 | |
2、查看帮助:
1 | |
3、启动Nginx:
1 | |
4、关闭Nginx:
1 | |
5、重新加载Nginx,即不需要重启,只重新加载配置文件:
1 | |
三、Nginx配置文件
Nginx的配置文件默认为/usr/local/nginx/conf/nginx.conf。
nginx.conf配置文件主要有三部分组成:
第一部分:全局块
全局块指的是配置文件开始到events块之间的内容。主要配置服务器整体运行的配置指令,比如配置运行Nginx服务器的用户(组)、允许生成的worker process数,进程PID存放路径、日志存放路径和类型以及配置文件的引入等。
第二部分:events块
events块主要影响Nginx服务器和用户的网络连接。常用的设置包括是否开启对多work process下的网络连接进行序列化,是否允许同时接收多个网络连接,选取哪种事件驱动模型来处理连接请求,每个word process可以同时支持的最大连接数等。
这部分配置对Nginx的性能影响较大。
第三部分:http块
http块是Nginx服务器配置中最频繁的部分,代理、缓存和日志定义等绝大多数功能和第三方模块的配置都在这里。
http块又分为http全局块和server块。
- http全局块:包括文件引入、MIME-TYPE定义、日志自定义、连接超时时间、单链接请求数上限等。
- server块:每个http块可以包括多个server块,每个server块相当于一个虚拟主机。每个server块也分为全局server块和location块:
- 全局server块:常见的配置包括本虚拟主机的监听配置、名称或IP配置
- location块:一个server块可以配置多个location块。主要作用是基于Nginx服务器接收到的请求字符串,对虚拟主机名称之外的字符串进行匹配,对特定的请求进行处理。地址定向、数据缓存和应答控制等功能,以及一些第三方模块的配置也在这里进行。
四、反向代理
1、概念
正向代理:代理的对象是客户端。客户端通过代理访问服务器,但服务端不知道具体的客户端是谁。
反向代理:代理的对象是服务器。客户端直接访问代理,代理去访问服务器,客户端只知道代理是谁,不知道服务器是谁。
2、实例一
实现效果:在浏览器中访问www.hellonginx.com,跳转到Linux系统tomcat主页面中。
流程:
www.hellonginx.com—->Nginx代理服务器—->tomcat服务器
准备工作:
- 确保Linux系统安装了tomcat,这里使用默认端口8080。
- 确保外界能够访问到Linux系统中的tomcat。可以通过设置开放端口、直接关闭防火墙两种方式。
具体配置:
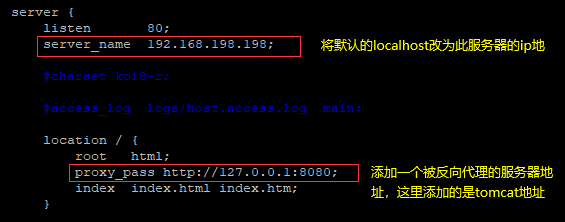
1、将域名和Nginx主机地址做映射。
在Windows系统的host文件中进行域名和ip对应关系的配置,即域名对应Nginx的主机地址,例www.hellonginx.com—-192.168.198.198:80。
在C:\Windows\System32\drivers\etc\hosts文件中,添加内容:
1 | |
配置好以后,在Windows系统浏览器中输入www.hellonginx.com就会访问Linux系统的Nginx,因为http默认端口就是80端口。
2、在Nginx中进行请求转发的配置(反向代理配置)。
在Nginx的配置文件nginx.conf中,在http块的server块中,将主机名改为主机ip地址,然后在location块中,添加请求转发的地址:
1 | |
配置好以后的内容如下图:
 反向代理配置
保存以后,重启Nginx服务即可生效。
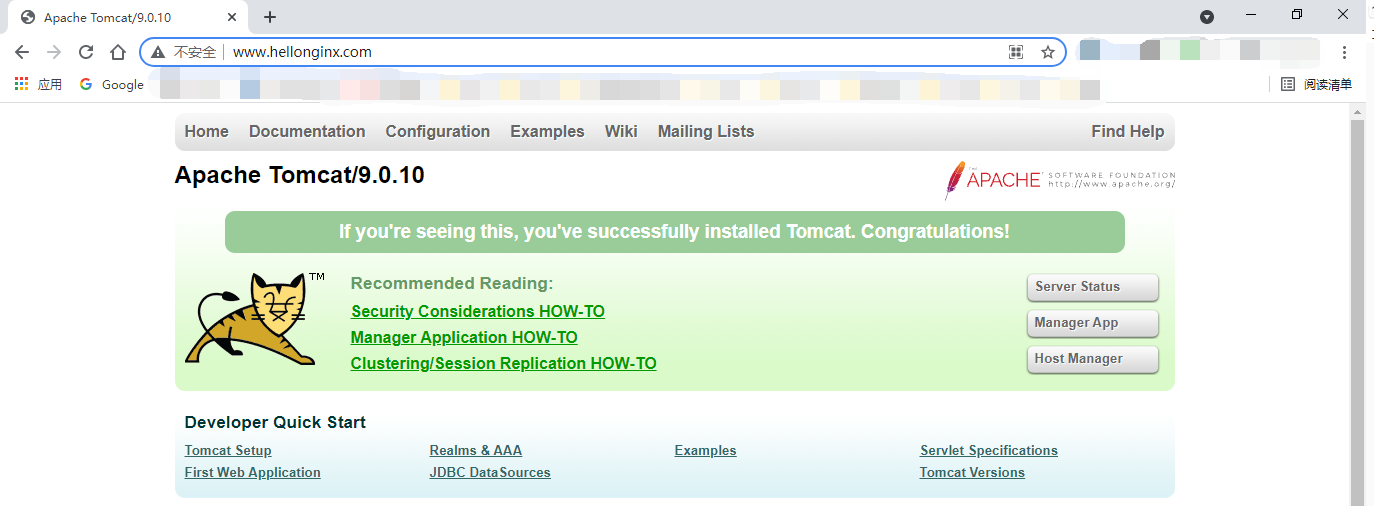 反向代理成功
3、实例二
实现效果:使用Nginx反向代理,根据访问的路径跳转到不同端口的服务中。
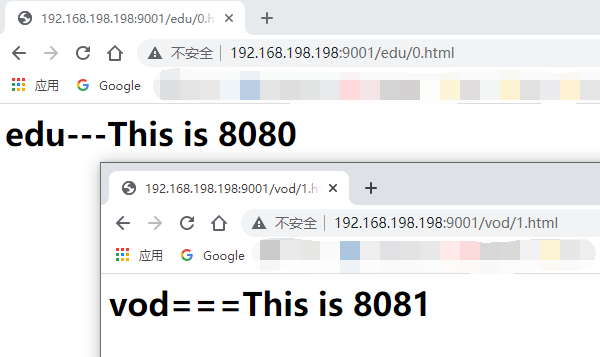
比如Nginx的监听端口为9001:
- 访问
http://192.168.198.198:9001/edu/,直接跳转到192.168.198.198:8080 - 访问
http://192.168.198.198:9001/vod/,直接跳转到192.168.198.198:8081
准备工作:
1、需要准备两个tomcat服务器,一个是8080端口,一个是8081端口。
可以使用docker容器,创建两个容器,分别用两个端口映射。也可以使用基础的方法,安装两个tomcat,将其中一个tomcat的默认端口号改为8081,在安装目录的server.xml文件中修改端口号。
启动两个tomcat。
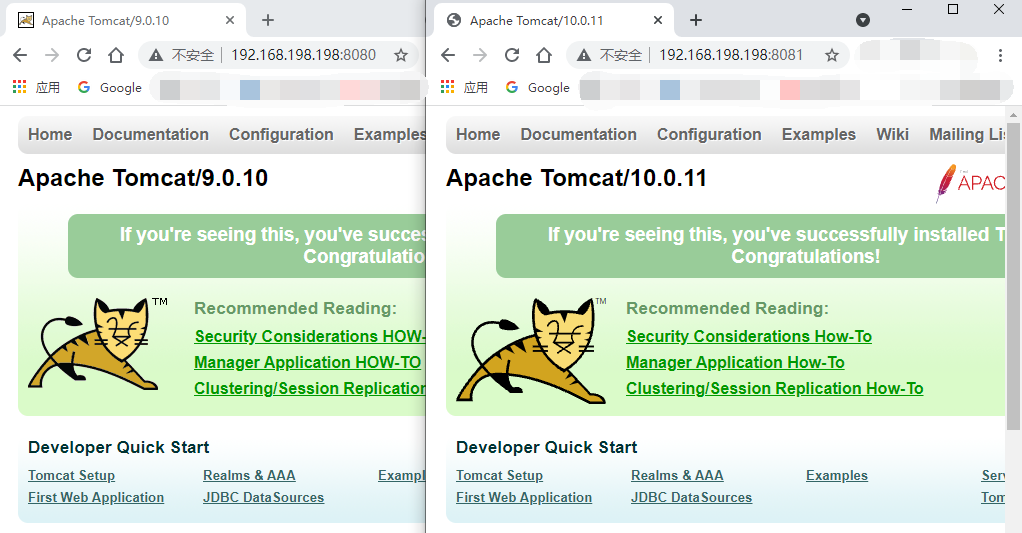 成功启动两个tomcat
2、在两个tomcat服务器中分别准备两个测试页面。
- 在8080端口的tomcat服务器的
webapps文件夹中创建目录edu,然后创建文件edu/0.html,测试通过192.168.198.198:8080/edu/0.html能够访问成功。 - 在8081端口的tomcat服务器的
webapps文件夹中创建目录vod,然后创建文件edu/1.html,测试通过192.168.198.198:8081/edu/1.html能够访问成功。
具体配置:
在Nginx的配置中,在http块中添加一个server块,内容如下
1 | |
location后面的
~表示后面的字符串是正则表达式形式。注意:如果是在外面系统访问Linux中的Nginx,记得开放端口,9001、8080、8081都需要开放。
代理结果
配置好以后,重新加载Nginx或者重启服务即可。就可以实现根据条件代理到不同服务器的效果:
 反向代理不同服务器
浏览器访问192.168.198.198:9001/edu/0.html,通过Nginx反向代理,会访问192.168.198.198:8080/edu/0.html
关于location反向代理的匹配规则,可以参考:https://segmentfault.com/a/1190000009651161
五、负载均衡
1、实例
实现目标
在浏览器输入http://192.168.198.198/edu/a.html,通过负载均衡,将请求平均分发到8080和8081两个tomcat服务器上。
准备工作
准备两台tomcat服务器,一台端口为是8080,另一台为8081。确保在Linux系统外都能够访问到这两个服务器。
在两个tomcat服务器的webapps目录下,创建edu/a.html文件,用于测试
具体配置
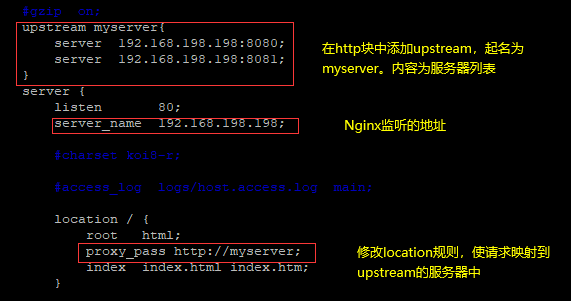
在Nginx的配置文件nginx.conf中配置。
- 在http块中添加
upstream,命名为myserver,然后列出服务器的列表。 - 在server块中的
location中添加规则,设置proxy_pass的值为http://myserver。
 负载均衡配置
重新加载Nginx即可生效。这样,每次访问192.168.198.198:80时,Nginx服务器会将请求根据配置要求分发到myserver列出的服务器中。
2、分配策略
Nginx的实现负载均衡有以下几种分配服务器策略:
1、轮询(默认)
轮询方式是Nginx默认的分配方式。
轮询是指每个请求按时间顺序逐一分配到不同的后端服务器,如果后端服务器down掉,能自动剔除。
2、权重weight
weight表示权重,默认为1,权重越高被分配的客户端越多。
配置方式:
1 | |
3、ip_hash
每个请求按访问ip的hash结果分配,这样同一个ip地址每次访问固定的一个后端服务器,可以解决session共享的问题。
配置方式:
1 | |
4、fair
按照后端服务器的响应时间分配请求,响应时间短的优先分配。
配置方式:
1 | |
六、动静分离
1、概念
动静分离:将动态请求和静态请求分开,可以理解为使用Nginx处理静态页面,Tomcat处理动态页面。
静态请求比如html页面、css样式、image图片等。
动态请求比如请求数据库的数据等。
动静分离有两种实现方式:
- 第一种是将静态文件独立成单独的域名,放在独立的服务器上。是目前常用的方法。
- 第二种是动态和静态文件混合在一起发布,通过Nginx分开。
通过配置文件的
location可以指定不同的后缀名实现不同的请求转发。expires参数可以设置浏览器缓存的过期时间。每次请求时,会对比服务器文件的更新时间,如果没有变化,则直接从浏览器缓存中取数据,否则才会从服务器下载。适合不经常变动的资源。
2、实例
实现目标
对于静态资源,使用Nginx访问,不通过tomcat服务器。
资源准备
准备好a.html和一个图片,例如/data/www/a.html和/data/image/abc.jpg。
具体配置
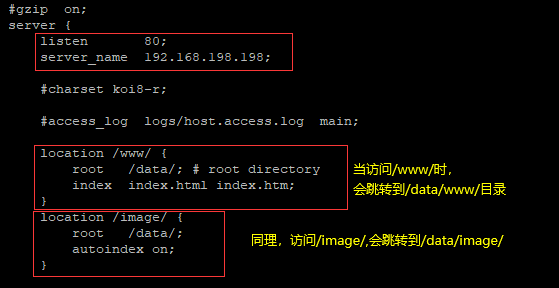
主要配置是在server块的location中:
 动静分离配置
root表示根目录,以/www/为例,当访问192.168.198.198/www/a.html时,Nginx会去访问/data/www/a.html。
index用于查找主页。
autoindex on表示开启自动显示目录。
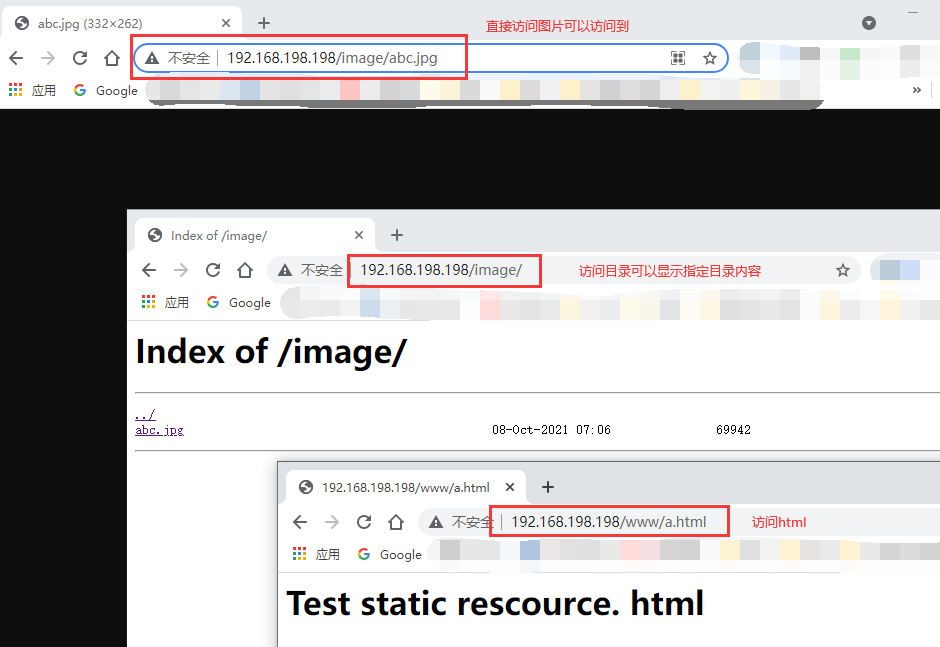
效果如下,这样的静态请求不会经过tomcat,由Nginx代理直接访问指定的目录。因此即使tomcat关闭,不会影响以下请求:
 动静分离实现效果
- 本文作者:Kangshitao
- 本文链接:http://kangshitao.github.io/2021/10/09/nginx/index.html
- 版权声明:本博客所有文章均采用 BY-NC-SA 许可协议,转载请注明出处!