使用SpringBoot2进行Web开发

一、对SpringMVC的自动配置

1.1 自动配置

SpringBoot中自动配置了SpringMVC,大多场景我们都不需要自定义配置。

在Spring的基础上,SpringBoot添加了以下的特征:

  • ContentNegotiatingViewResolver (内容协商视图解析器)和BeanNameViewResolver(BeanName)视图解析器
  • 支持静态资源,包括webjars
  • 自动注册 Converter,GenericConverter,Formatter
  • 支持HeepMessageConverters
  • 自动注册MessageCodesResolver,用于国际化
  • 静态index.html支持
  • 自定义facicon
  • 自动使用 ConfigurableWebBindingInitializer ,(DataBinder负责将请求数据绑定到JavaBean上)

1.2 自定义配置

SpringBoot为我们提供了WebMvcConfigurer接口,可以实现对SpringMVC的各项自定义功能:

1
2
3
4
5
6
7
8
9
10
11
12
13
14
15
16
17
18
19
20
21
22
23
24
25
26
27
28
29
30
31
32
33
34
35
36
37
38
39
40
public interface WebMvcConfigurer {
default void configurePathMatch(PathMatchConfigurer configurer) {}

default void configureContentNegotiation(ContentNegotiationConfigurer configurer) {}

default void configureAsyncSupport(AsyncSupportConfigurer configurer) {}

default void configureDefaultServletHandling(DefaultServletHandlerConfigurer configurer) {}

default void addFormatters(FormatterRegistry registry) {}

default void addInterceptors(InterceptorRegistry registry) {}

default void addResourceHandlers(ResourceHandlerRegistry registry) {}

default void addCorsMappings(CorsRegistry registry) {}

default void addViewControllers(ViewControllerRegistry registry) {}

default void configureViewResolvers(ViewResolverRegistry registry) {}

default void addArgumentResolvers(List<HandlerMethodArgumentResolver> resolvers) {}

default void addReturnValueHandlers(List<HandlerMethodReturnValueHandler> handlers) {}

default void configureMessageConverters(List<HttpMessageConverter<?>> converters) {}

default void extendMessageConverters(List<HttpMessageConverter<?>> converters) {}


default void configureHandlerExceptionResolvers(List<HandlerExceptionResolver> resolvers) {}

default void extendHandlerExceptionResolvers(List<HandlerExceptionResolver> resolvers) {}

@Nullable
default Validator getValidator() {return null;}

@Nullable
default MessageCodesResolver getMessageCodesResolver() {return null;}
}

我们有两种方式自定义这个接口,都需要先准备一个配置类:

  • 直接实现接口,然后按需实现其中的方法。
  • 使用@Bean注解返回组件。

两种方式的代码如下:

1
2
3
4
5
6
7
//方式一:实现WebMvcConfigurer接口
@Configuration(proxyBeanMethods = false)
public class WebConfig implements WebMvcConfigurer {
//重写需要自定义的方法即可
@Override
public void configurePathMatch(PathMatchConfigurer configurer) {...}
}
1
2
3
4
5
6
7
8
9
10
11
12
13
14
//方式二:使用注解
@Configuration(proxyBeanMethods = false)
public class WebConfig {
@Bean
public WebMvcConfigurer webMvcConfigurer(){
//将匿名实现类返回
return new WebMvcConfigurer() {
//重写需要自定义的方法
@Override
public void configurePathMatch(PathMatchConfigurer configurer) {...}
};
}
}

关于SpringMVC的功能定制,都可以在这个配置类中进行自定义。

二、简单功能分析

2.1 静态资源访问

2.1.1 静态资源目录

SpringBoot默认将静态资源放在以下目录,查找顺序从上往下:

main/resources/META-INF/resources

main/resources/resources

main/resources/static

main/resources/public

以上文件夹的静态资源访问时,使用当前项目根路径/静态资源名即可访问。

SpringBoot底层使用/**拦截了所有请求。当收到一个请求时,会先判断controller能不能处理,如果不能处理就交给静态资源处理,都不能处理则返回404。

2.1.2 静态资源访问前缀

默认静态资源访问无前缀,可以通过配置,改变默认的静态资源访问前缀和访问路径:

1
2
3
4
5
spring:
mvc:
static-path-pattern: /res/** # 指定所有静态资源的访问前缀
resources:
static-locations: [classpath:/mystatic/] # 重新指定静态资源的存放路径

如果添加了静态资源的访问前缀,这样访问所有静态资源都要使用指定的前缀。

如果修改了静态资源的目录,这样只能访问指定路径下的静态资源,默认的路径全失效。

2.1.3 webjar

项目路径/webjars/**

webjar

需要引入依赖,比如引入webjars的jquery:

1
2
3
4
5
<dependency>
<groupId>org.webjars</groupId>
<artifactId>jquery</artifactId>
<version>3.5.1</version>
</dependency>

此时访问地址为:http://localhost:8080/webjars/jquery/3.5.1/jquery.js,后面的地址需要按照依赖里面的包路径。

2.2 欢迎页支持

SpringBoot支持欢迎页,默认静态资源路径下的index.html会被当作欢迎页。

可以配置静态资源路径。

但是如果配置了静态资源的访问前缀,欢迎页就会失效,因为源码中判断只能在默认静态资源路径中访问欢迎页:

1
if (welcomePage != null && "/**".equals(staticPathPattern)){}

2.3 自定义Favicon

将图标命名为favicon.ico,并放在静态资源目录下即可。同样地,静态资源访问前缀会导致其失效。

2.4 静态资源配置原理

2.4.1 资源处理的默认规则

1、SpringBoot启动默认加载自动配置类。

2、添加了Web框架支持的项目会自动导入web常见启动器,然后SpringMVC的自动配置类 WebMvcAutoConfiguration就会生效:

1
2
3
4
5
6
7
8
9
10
11
12
13
14
15
16
17
18
19
@Configuration(proxyBeanMethods = false)
@ConditionalOnWebApplication(type = Type.SERVLET)
@ConditionalOnClass({ Servlet.class,
DispatcherServlet.class,
WebMvcConfigurer.class })
@ConditionalOnMissingBean(WebMvcConfigurationSupport.class)
@AutoConfigureOrder(Ordered.HIGHEST_PRECEDENCE + 10)
@AutoConfigureAfter({ DispatcherServletAutoConfiguration.class,
TaskExecutionAutoConfiguration.class,
ValidationAutoConfiguration.class })
public class WebMvcAutoConfiguration {
//The default Spring MVC view prefix.
public static final String DEFAULT_PREFIX = "";

//The default Spring MVC view suffix.
public static final String DEFAULT_SUFFIX = "";
private static final String SERVLET_LOCATION = "/";
...
}

3、WebMvcAutoConfiguration中有一个静态内部类,WebMvcAutoConfigurationAdapter:

1
2
3
4
5
6
7
8
9
@SuppressWarnings("deprecation")
@Configuration(proxyBeanMethods = false)
@Import(EnableWebMvcConfiguration.class)
@EnableConfigurationProperties({WebMvcProperties.class,
ResourceProperties.class,
WebProperties.class })
@Order(0)
public static class WebMvcAutoConfigurationAdapter
implements WebMvcConfigurer, ServletContextAware{}

可以看到,其绑定了三个xxxProperties类,这三个类中定义了SpringMVC应用的参数的默认值,并且绑定了配置文件中的spring.mvcspring.resourcesspring.web三个对应的配置前缀,我们只需要在配置文件中配置这些参数即可修改默认值。其中在WebProperties这个类中,就定义了静态资源的默认访问路径。

这个内部类,只有一个有参构造器,这个构造器中所有参数的值都会从容器中确定,构造器代码:

1
2
3
4
5
6
7
8
9
10
11
12
13
14
15
16
17
18
public WebMvcAutoConfigurationAdapter(...一堆参数) {
//获取和spring.resources绑定的所有的值的对象
this.resourceProperties = resourceProperties.hasBeenCustomized()
? resourceProperties: webProperties.getResources();
//获取和spring.mvc绑定的所有的值的对象
this.mvcProperties = mvcProperties;
//Spring的beanFactory
this.beanFactory = beanFactory;
//找到所有的HttpMessageConverters
this.messageConvertersProvider = messageConvertersProvider;
//找到资源处理器的自定义器
this.resourceHandlerRegistrationCustomizer =
resourceHandlerRegistrationCustomizerProvider.getIfAvailable();
this.dispatcherServletPath = dispatcherServletPath;
//给应用注册Servlet、Filter....
this.servletRegistrations = servletRegistrations;
this.mvcProperties.checkConfiguration();
}

2.4.2 欢迎页的处理规则

1
2
3
4
5
6
7
8
9
10
11
12
13
14
15
16
17
18
19
final class WelcomePageHandlerMapping extends AbstractUrlHandlerMapping {
...
WelcomePageHandlerMapping(TemplateAvailabilityProviders templateAvailabilityProviders,
ApplicationContext applicationContext,
Resource welcomePage,
String staticPathPattern) {
//可以看到,要使用欢迎页,必须是/**
if (welcomePage != null && "/**".equals(staticPathPattern)) {
logger.info("Adding welcome page: " + welcomePage);
setRootViewName("forward:index.html");
}
else if (welcomeTemplateExists(templateAvailabilityProviders,
applicationContext)) {
logger.info("Adding welcome page template: index");
setRootViewName("index");
}
}
...
}

三、请求映射和参数处理

3.1 请求映射

3.1.1 REST的使用与原理

使用

使用xxxMapping注解表示对收到的请求进行处理。

  • RequestMapping:适用于各种请求
  • @GetMapping:只适用于get请求,RESTful风格中表示获取、查询信息
  • @PostMapping:只适用于post请求,RESTful风格中表示添加信息
  • @PutMapping:只适用于put请求中,RESTful风格中表示修改信息
  • @DeleteMapping:只适用于delete请求,RESTful风格中表示删除信息。

form表单只支持get和post两种提交方式,如何确保请求方式为put和delete呢?

方法:

  • 首先需要在配置文件中开启隐藏域方法支持,SpringBoot2.5.2已经默认开启了:

    1
    2
    3
    4
    5
    spring:
    mvc:
    hiddenmethod:
    filter:
    enabled: true
  • form表单中有一个隐藏方法域,在其中定义请求方式,需要在method=post的前提下使用:

    test.html

    1
    2
    3
    4
    5
    6
    7
    8
    9
    10
    11
    12
    13
    14
    15
    <form action="/user" method="get">
    <input value="REST-GET提交" type="submit"/>
    </form>
    <form action="/user" method="post">
    <input value="REST-POST提交" type="submit"/>
    </form>
    <!-- 必须在post请求里面定义_method隐藏域才能生效 -->
    <form action="/user" method="post">
    <input name="_method" type="hidden" value="delete"/>
    <input value="REST-DELETE提交" type="submit"/>
    </form>
    <form action=" /user" method="post">
    <input name="_method" type="hidden" value="PUT"/>
    <input value="REST-PUT提交" type="submit"/>
    </form>

    这样,在controller收到请求后,如果是post请求,带有_method隐藏域的话,会获取其value值,确认请求方式。

    1
    2
    3
    4
    5
    6
    7
    8
    9
    10
    11
    12
    13
    14
    15
    16
    17
    18
    19
    @GetMapping("/user")
    public String getUser(){
    return "GET请求";
    }

    @PostMapping("/user")
    public String saveUser(){
    return "POST请求";
    }

    @PutMapping("/user")
    public String putUser(){
    return "PUT请求";
    }

    @DeleteMapping("/user")
    public String deleteUser(){
    return "DELETE请求";
    }

我们也可以自定义过滤器,将_method修改为自定义的字符串。根据源码分析可以,我们需要对HiddenHttpMethodFilter这个过滤器组件进行配置。

因此我们定义一个配置类,在其中使用@Bean注解,注入我们自定义的组件,这样底层就会使用我们手动注入的组件:

1
2
3
4
5
6
7
8
9
10
11
12
//定义一个配置类
@Configuration(proxyBeanMethods = false)
public class WebConfig{
//配置组件并注入
@Bean
public HiddenHttpMethodFilter hiddenHttpMethodFilter(){
HiddenHttpMethodFilter hiddenHttpMethodFilter = new HiddenHttpMethodFilter();
//在这里将隐藏域方法名改为自定义名字,比如改为_m
hiddenHttpMethodFilter.setMethodParam("_m");
return hiddenHttpMethodFilter;
}
}

REST原理

  • 表单提交的时候,会带上隐藏域_method
  • 请求会被HiddenHttpMethodFilter拦截,判断请求是否正常,并且是POST方式,才做以下操作:
    • 获取到_method的值,将value的值统一转化为大写。
    • 会兼容PUT、DELETE、PATCH三种请求
    • 原生request的包装(装饰器)模式,requestWrapper重写了getMethod()方法,返回的是传入的值。
    • 过滤器链放行的时候,使用的是wrapper,以后的方法调用的都是requestWrapper的getMethod()方法

3.1.2 请求映射原理

SpringMVC的功能分析都从DispatcherServletdoDispatch()方法入手,其继承体系如下:

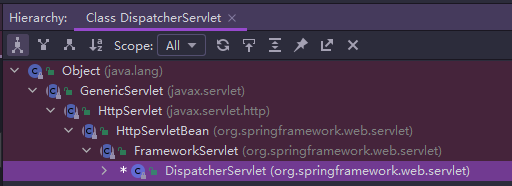
DispatcherServlet继承体系

doDispatch()方法会遍历查找,找到当前请求会使用哪个Handler(即Controller方法)进行处理。

具体来说,所有的请求映射,都会保存在HandlerMapping中。

共有以下几种HandleMapping

  • RequestMappingHandlerMapping
  • WelcomePageHandlerHandlerMapping
  • BeanNameUrlHandlerMapping
  • RouterFunctionHandlerMapping
  • SimpleUrlHandlerMapping
  • 比如WelcomePageHandlerMapping,就能够访问index.html这个页面
  • SpringBoot自动配置了默认的RequestMappingHandlerMapping
  • 请求进来后,会依次遍历所有的HandlerMapping,查看是否有请求信息。
    • 如果有就找到这个请求对应的handler
    • 如果没有就继续查找下一个 HandlerMapping

如果我们需要自定义的映射处理,我们可以定义自己的HandlerMapping。具体做法为在配置类中,使用@Bean注入定义的组件,在方法里面自定义我们自己的组件。

3.2 参数处理

这里的参数处理主要指的是控制器(controller)方法中的参数。

3.2.1 基本注解

在参数中,可以使用以下注解:

@PathVariable:路径变量,比如RESTful风格的变量

@RequestHeader:获取请求头

@RequestAttribute:获取请求域属性

@RequestParam:获取请求参数,比如url中?后面的变量

@RequestBody:获取请求体

@MatrixVariable:矩阵变量。如果矩阵变量同名,可以使用这个注解的pathVar进行区分。使用详情参考:矩阵变量

@CookieValue:获取cookie值

3.2.2 Servlet API

除了在参数位置使用简单的注解外,我们还可以传入Servlet API类型的参数。

比如在controller中进行结果跳转的时候,我们有一种使用Servlet API的方式进行跳转:

1
2
3
4
5
6
7
8
9
@Controller
public class RequestAttributeController {
@GetMapping("/goto")
public String goToPage(HttpServletRequest request){
request.setAttribute("msg","Success!");
request.setAttribute("code","200");
return "forward:/success"; //请求转发到/success请求
}
}

通过debug源码可知,对HttpServletRequest类型的参数解析,使用的是名为ServletRequestMethodArgumentResolver的参数解析器进行解析的,这个参数解析器能够解析的所有类型如下:

1
2
3
4
5
6
7
8
9
10
11
12
13
14
15
16
@Override
public boolean supportsParameter(MethodParameter parameter) {
Class<?> paramType = parameter.getParameterType();
return (WebRequest.class.isAssignableFrom(paramType) ||
ServletRequest.class.isAssignableFrom(paramType) ||
MultipartRequest.class.isAssignableFrom(paramType) ||
HttpSession.class.isAssignableFrom(paramType) ||
(pushBuilder != null && pushBuilder.isAssignableFrom(paramType)) ||
Principal.class.isAssignableFrom(paramType) ||
InputStream.class.isAssignableFrom(paramType) ||
Reader.class.isAssignableFrom(paramType) ||
HttpMethod.class == paramType ||
Locale.class == paramType ||
TimeZone.class == paramType ||
ZoneId.class == paramType);
}

3.2.3 复杂参数

controller方法中的参数也可以是Map、Model、ModelMap、ModelAndView类型的对象。

这些类型的对象里面的数据,会被放到请求域中

3.2.4 自定义对象参数

controller方法中的参数也可以是自定义类型,会自动将参数名和变量名匹配。如果不匹配的则值为null

比如:

1
2
3
4
5
6
7
8
9
10
11
12
13
14
15
16
17
18
19
20
21
22
23
24
25
26
27
28
29
30
31
32
/**  前端页面请求
* 姓名: <input name="userName"/> <br/>
* 年龄: <input name="age"/> <br/>
* 生日: <input name="birth"/> <br/>
* 宠物姓名:<input name="pet.name"/><br/>
* 宠物年龄:<input name="pet.age"/>
*/

//Person类
public class Person {
private String userName;
private Integer age;
private Date birth;
private Pet pet;
...
}

//Pet类
public class Pet {
private String name;
private String age;
...
}
//controller
@RestController
public class MyController {
@GetMapping("/person")
public String goToPage(Person person){
//person中的值会自动匹配参数的值
return person;
}
}

3.3 参数处理原理

HandlerMapping中找到能够处理请求的Handler,然后为当前Handler找一个适配器,即HandlerAdapter,比如说RequestMappingHandlerAdapter

适配器执行目标方法并确定方法参数的每一个值。大致流程如下:

1、执行目标方法。

1
mav = invokeHandlerMethod(request, response, handlerMethod); //执行目标方法

执行目标方法的细节进一步分析如下。

2、确定要执行的目标方法的每一个参数的值是什么。SpringMVC目标方法能写多少种参数类型,取决于参数解析器。

InvocableHandlerMethod类的getMethodArgumentValues方法中确定目标方法每个参数的值。

底层会遍历参数解析器,如果当前参数解析器能解析当前参数,就调用这个解析器的相关方法进行解析。

3、返回值处理器。返回值处理由返回值处理器进行处理,比如ModelMethodProcessorResponseBodyEmitterReturnValueHandler等。

4、当目标方法完成后,所有的数据都会保存在ModelAndViewContainer中,其中包含了视图View,以及Model数据。

5、最后处理派发结果,调用processDispatchResult()方法。

在执行的过程中,底层会将model中的所有数据都放到请求域中:

1
2
3
4
5
6
7
8
9
10
11
12
protected void exposeModelAsRequestAttributes(Map<String, Object> model,
HttpServletRequest request) throws Exception {
//model中的所有数据遍历挨个放在请求域中
model.forEach((name, value) -> {
if (value != null) {
request.setAttribute(name, value);
}
else {
request.removeAttribute(name);
}
});
}

3.4 自定义类型参数封装POJO

底层对参数封装为POJO对象的时候,定义了大量的类型转换器(converter),比如StringToNumber是字符串转为数字类型的一个转换器。

其中在进行封装之前,会调用isSimpleValueType方法判断是否是简单类型。

如果我们想自定义一个类型转换器,参考源码中类型转换器的写法,我们可以在WebDataBinder里面放入自己定义的Converter.

在配置类中,自定义WebMvcConfigurer组件:

1
2
3
4
5
6
7
8
9
10
11
12
13
14
15
16
17
18
19
20
21
22
23
24
25
26
27
28
29
30
31
32
//1、WebMvcConfigurer定制化SpringMVC的功能
@Bean
public WebMvcConfigurer webMvcConfigurer(){
return new WebMvcConfigurer() {
@Override
public void configurePathMatch(PathMatchConfigurer configurer) {
UrlPathHelper urlPathHelper = new UrlPathHelper();
// 不移除;后面的内容。矩阵变量功能就可以生效
urlPathHelper.setRemoveSemicolonContent(false);
configurer.setUrlPathHelper(urlPathHelper);
}

@Override
public void addFormatters(FormatterRegistry registry) {
registry.addConverter(new Converter<String, Pet>() {

@Override
public Pet convert(String source) {
// dog,3
if(!StringUtils.isEmpty(source)){
Pet pet = new Pet();
String[] split = source.split(",");
pet.setName(split[0]);
pet.setAge(Integer.parseInt(split[1]));
return pet;
}
return null;
}
});
}
};
}

这样,当我们收到一个字符串dog,3的时候,也能够将其解析并封装到Pet中的nameage中。

四、数据响应与内容协商

4.1 响应JSON

SpringBoot的Web场景自动引入了JSON场景,可以返回JSON数据

4.2 返回值解析器

前面说过,controller的返回值是要经过返回值处理器(解析器)进行处理的:

  • 返回值解析器判断是否支持这种类型返回值—-supportsReturnType
  • 返回值解析器调用handleReturnValue处理
  • RequestResponseBodyMethodProcessor可以处理标了@ResponseBody注解方法:
    • 利用MessageConverters进行处理,将数据写为JSON:
      • 内容协商:浏览器默认会以请求头的方式告诉服务器能够接收什么类型的数据;服务器根据自己的能力,决定能生产出什么内容类型的数据。
      • 其中,SpringMVC会依次遍历容器底层所有的HttpMessageConverter消息转换器),看谁能对数据进行处理。比如,MappingJackson2HttpMessageConverter可以将对象转为JSON数据再写出去。

SpringMVC支持的返回值类型

1
2
3
4
5
6
7
8
9
10
11
12
13
14
ModelAndView
Model
View
ResponseEntity
ResponseBodyEmitter
StreamingResponseBody
HttpEntity
HttpHeaders
Callable
DeferredResult
ListenableFuture
CompletionStage
WebAsyncTask
@ModelAttribute且为对象类型的@ResponseBody 注解,使用RequestResponseBodyMethodProcessor

关于HttpMessageConverter

消息转换器HttpMessageConverter接口中有canRead()canWrite()方法,用于判断当前消息转换器能够对数据进行读和写。

默认的消息转换器包括:

  • ByteArrayHttpMessageConverter:支持Byte类型
  • StringHttpMessageConverter:支持String类型
  • ResourceHttpMessageConverter:支持Resource类型
  • ResourceRegionHttpMessageConverter:支持ResourceRegion类型
  • SourceHttpMessageConverter:支持DOMSource、 SAXSource、 StAXSource、StreamSource、Source类型。
  • AllEncompassingFormHttpMessageConverter:支持MultiValueMap类型
  • MappingJackson2HttpMessageConverter:无论什么类都返回true,可以将任何类型的对象转换为浏览器所想要的数据类型;
  • Jaxb2RootElementHttpMessageConverter:支持注解方式xml处理的

4.3 内容协商

内容协商指的是,根据客户端接收能力不同,返回不同媒体类型的数据。

SpringBoot中的Web场景引入了JSON依赖,因此可以返回JSON数据,但没有引入XML依赖,如果想要返回XML类型的数据,需要手动引入以下依赖:

1
2
3
4
5
6
7
<!-- xml数据处理,会使返回数据类型为XML类型
添加这个依赖后,系统启动会自动生成MappingJackson2XmlHttpMessageConverter
-->
<dependency>
<groupId>com.fasterxml.jackson.dataformat</groupId>
<artifactId>jackson-dataformat-xml</artifactId>
</dependency>

4.3.1 开启内容协商功能

SpringBoot的内容协商功能默认是关闭的,可以手动开启:

1
2
3
4
spring:
mvc:
contentnegotiation:
favor-parameter: true

开启内容协商功能后,可以使用format参数指定要接收的参数类型,方便浏览器通过修改参数的方式完成内容协商。

比如:

http://localhost:8080/test/person?format=json请求会返回JSON类型的数据;

http://localhost:8080/test/person?format=xml请求会返回XML类型的数据。

4.3.2 内容协商原理

1、首先判断当前响应头是否已经有确定的媒体类型(MediaType)

2、获取客户端支持接受的内容类型

3、遍历循环当前系统的MessageConverter,看谁支持操作这个对象

4、找到支持操作当前对象的消息转换器,把这个消息转换器支持的媒体类型统计出来。

5、进行内容协商,选出最佳匹配的媒体类型

6、用这个能够将对象转化为最佳匹配类型的转换器,进行转化

4.3.3 自定义消息转换器

参考官方文档:Path Matching and Content Negotiation

如果我们想定义自己的消息转换器,比如我们想要传入format=gg,解析为application/x-guigu类型。

首先需要定义转换器,实现HttpMessageConverter接口:

1
2
3
4
5
6
7
8
9
10
11
12
13
14
15
16
17
18
19
20
21
22
23
24
25
26
27
28
29
30
31
32
33
34
35
36
37
public class GuiguMessageConverter implements HttpMessageConverter<Person> {
@Override
public boolean canRead(Class<?> clazz, MediaType mediaType) {
return false;
}
@Override
public boolean canWrite(Class<?> clazz, MediaType mediaType) {
return clazz.isAssignableFrom(Person.class);
}
/*
服务器要统计所有MessageConverter都能写出哪些内容类型。
自定义类型application/x-guigu
将自定义类型添加到能够解析的类型中
*/
@Override
public List<MediaType> getSupportedMediaTypes() {
return MediaType.parseMediaTypes("application/x-guigu");
}
@Override
public Person read(Class<? extends Person> clazz,
HttpInputMessage inputMessage)
throws IOException, HttpMessageNotReadableException {
return null;
}

@Override
public void write(Person person, MediaType contentType,
HttpOutputMessage outputMessage)
throws IOException, HttpMessageNotWritableException {
//自定义协议数据的写出
String data = person.getUserName()+";"+person.getAge()+";"+person.getBirth();

//写出去
OutputStream body = outputMessage.getBody();
body.write(data.getBytes(StandardCharsets.UTF_8));
}
}

然后,我们需要将我们自己的消息转换器添加到底层的消息转换器中,

1
2
3
4
5
6
7
8
9
10
11
12
13
14
15
16
17
18
19
20
21
22
23
24
25
26
27
28
29
30
31
32
33
34
35
36
@Configuration(proxyBeanMethods = false)
public class WebConfig {

//我们需要自定义WebMvcConfigurer组件
@Bean
public WebMvcConfigurer webMvcConfigurer(){
return new WebMvcConfigurer() {
/*
扩展MessageConverter,以实现我们自定义的对象写成自定义格式的数据
将我们自己实现的Converter添加进去即可
*/
@Override
public void extendMessageConverters(
List<HttpMessageConverter<?>> converters) {
converters.add(new GuiguMessageConverter());
}

//重写内容协商器,使客户端能够通过URL参数传递我们自定义的类型
@Override
public void configureContentNegotiation(ContentNegotiationConfigurer configurer) {
Map<String, MediaType> mediaTypeMap = new HashMap<>();
//这里只添加三种,则参数只能传递这三种类型
mediaTypeMap.put("json",MediaType.APPLICATION_JSON);
mediaTypeMap.put("xml",MediaType.APPLICATION_XML);
mediaTypeMap.put("gg",MediaType.parseMediaType("application/x-guigu"));
//指定支持哪些参数对应的哪些媒体类型
//将基于参数的协商管理器放到里面
ParameterContentNegotiationStrategy parameterStrategy = new ParameterContentNegotiationStrategy(mediaTypeMap);

//将基于请求头的协商管理器放入
HeaderContentNegotiationStrategy headerStrategy = new HeaderContentNegotiationStrategy();
configurer.strategies(Arrays.asList(parameterStrategy,headerStrategy));
}
};
}
}

这样,我们就可以在format参数传入gg关键字,将会调用自定义的转换器转换为x-guigu类型。

注意到,我们如果重写内容协商器,可能会导致一些默认的功能失效,推荐的方式是在配置文件中使用配置,想要自定义什么就配置什么,SpringBoot已经帮我们把能够自定义的内容都绑定到了配置文件中,只需要按需配置即可。

1
2
3
4
spring:
mvc:
contentnegotiation:
media-types: {gg: application/x-guigu}

添加配置,当format参数为gg时,映射为application/x-guigu。

五、视图解析与模版引擎

SpringBoot默认不支持JSP,需要引入第三方模版引擎技术实现页面渲染

5.1 视图解析

视图解析流程:

1、目标方法处理的过程中,所有数据都会放在ModelAndViewContainer中,包括数据和视图地址

2、任何目标方法执行完成后,都会返回一个ModelAndView

3、processDispatchResult处理派发结果,即页面如何响应

  • 调用render(mv,request,response)方法进行页面渲染:
    • 根据方法的String返回值得到View对象
      • 所有的视图解析器尝试是否能根据当前返回值得到View对象,找到以后就进行渲染。
      • 如果是redirect开头,表示重定向的返回值,则会调用response.sendRedirect()重定向;请求转发也是如此。

总结:

  • 返回值以forward:开始,则调用 new InternalResourceView(forwardUrl); 进行请求转发。
    • 内部调用request.getRequestDispatcher(path).forward(request, response);
  • 返回值以redirect:开始,则调用new RedirectView()进行重定向。

  • 返回值是普通字符串:new ThymeleafView()

5.2 模版引擎-Thymeleaf

Thymeleaf是现代化的服务端Java模版引擎,能够处理HTML、XML、JavaScript、CSS,甚至纯文本数据(Plain Text)。

SpringBoot默认不支持JSP,因此我们使用Thymeleaf模版引擎代替JSP功能。

Thymeleaf的使用方法参考官方ThymeleafThymeleaf的使用

表达式名字 语法 用途
变量取值 ${…} 获取请求域、session域、对象等值
选择变量 *{…} 获取上下文对象值
消息 #{…} 获取国际化等值
链接 @{…} 生成链接
片段表达式 ~{…} jsp:include 作用,引入公共页面片段

SpringBoot为我们自动配置好了Thymeleaf,我们只需要引入Thymeleaf依赖,然后开发页面即可。

1
2
3
4
<dependency>
<groupId>org.springframework.boot</groupId>
<artifactId>spring-boot-starter-thymeleaf</artifactId>
</dependency>
1
2
3
public static final String DEFAULT_PREFIX = "classpath:/templates/";

public static final String DEFAULT_SUFFIX = ".html"; //xxx.html

此外,需要在html页面加入Thymeleaf命名空间:

1
2
3
4
5
<!DOCTYPE html>
<html lang="en" xmlns:th="http://www.thymeleaf.org">
<head></head>
...
</html>

可以看到,我们的controller返回视图名的时候,底层会自动添加前缀和后缀,类似于SpringMVC的视图解析器。

默认情况下我们将页面放到templates文件夹,并且后缀名为.html

六、拦截器

6.1 配置拦截器

自定义拦截器的步骤如下

1、编写一个拦截器类,实现HandlerInterceptor接口。

2、将拦截器注册到容器中,即实现WebMvcConfigureraddInterceptors方法

3、指定拦截规则。如果拦截所有请求(/**),静态资源也会被拦截。可以使用配置静态资源路径手动排除静态资源请求两种方式解决。

代码如下:

1、实现接口

1
2
3
4
5
6
7
8
9
10
11
12
13
14
15
16
17
18
19
20
21
22
23
24
25
26
27
28
29
30
31
32
33
34
35
36
37
38
39
40
41
42
43
44
45
46
/**使用拦截器实现登录检查的功能。验证用户登陆,保证只有用户登陆才能操作别的页面。
* 1.配置好拦截器要拦截哪些请求
* 2.把这些配置放在容器中
*/
public class LoginInterceptor implements HandlerInterceptor {
/**
* 目标方法执行之前,可以在这里写验证是否登陆的逻辑,然后判断是否放行
*/
@Override
public boolean preHandle(HttpServletRequest request,
HttpServletResponse response,
Object handler) throws Exception {
//登录检查逻辑
HttpSession session = request.getSession();
Object loginUser = session.getAttribute("loginUser");
//假设只要session中有登陆用户就算登陆
if(loginUser!=null){
return true; //放行
}
/*
如果被拦截,就跳转到登录页面,并将错误信息返回
并根据实际情况,决定将反馈信息放在请求域还是session中
*/

//session.setAttribute("msg","请登录");
//response.sendRedirect("/"); //重定向
request.setAttribute("msg","请登录");
request.getRequestDispatcher("/").forward(request,response);
return false;
}

//目标方式执行之后
@Override
public void postHandle(HttpServletRequest request,
HttpServletResponse response,
Object handler,
ModelAndView modelAndView) throws Exception {

}

//页面渲染之后
@Override
public void afterCompletion(HttpServletRequest request,
HttpServletResponse response,
Object handler, Exception ex) throws Exception {}
}

2、放到容器中

1
2
3
4
5
6
7
8
9
10
11
12
13
14
15
16
@Configuration
public class AdminWebConfig implements WebMvcConfigurer {

/**
* 配置自定义的拦截器,并设置要拦截的请求和不拦截的请求
*/
@Override
public void addInterceptors(InterceptorRegistry registry) {
//将定义好的拦截器添加到配置中,指定要拦截的请求,排除不需要拦截的请求。
registry.addInterceptor(new LoginInterceptor())
.addPathPatterns("/**")
.excludePathPatterns("/","/login","/css/**","/js/**",
"/fonts/**","/images/**");
//先拦截所有请求,然后排除登陆页面的请求和所有静态资源的请求
}
}

排除静态资源:

  • 方式一:排除静态资源请求,比如上述代码。

  • 方式二:设置静态资源的访问路径,比如拦截所有以/static开头的静态资源请求,配置语句为:

    1
    spring.mvc.static-path-pattern=/static/**

6.2 拦截器原理

1、根据当前请求,找到HandlerExecutionChain,即可以处理请求的handler以及handler的所有拦截器.

2、先顺序执行每个拦截器的preHandle()方法,根据这个方法的返回值决定下一步:

  • 如果当前拦截器的preHandle()方法返回true,则继续执行下一个拦截器的preHandle()方法
  • 如果任何一个拦截器的preHandle()方法返回false,直接倒序执行所有已经执行了的拦截器afterCompletion。不会执行目标方法。

3、只有所有的拦截器都返回true的时候,才执行目标方法。

4、然后倒序执行所有拦截器的postHandle()方法。

5、前面的任何步骤出现异常,都会直接倒序执行afterCompletion()`方法。

6、页面渲染完成后,倒序执行afterCompletion()方法。
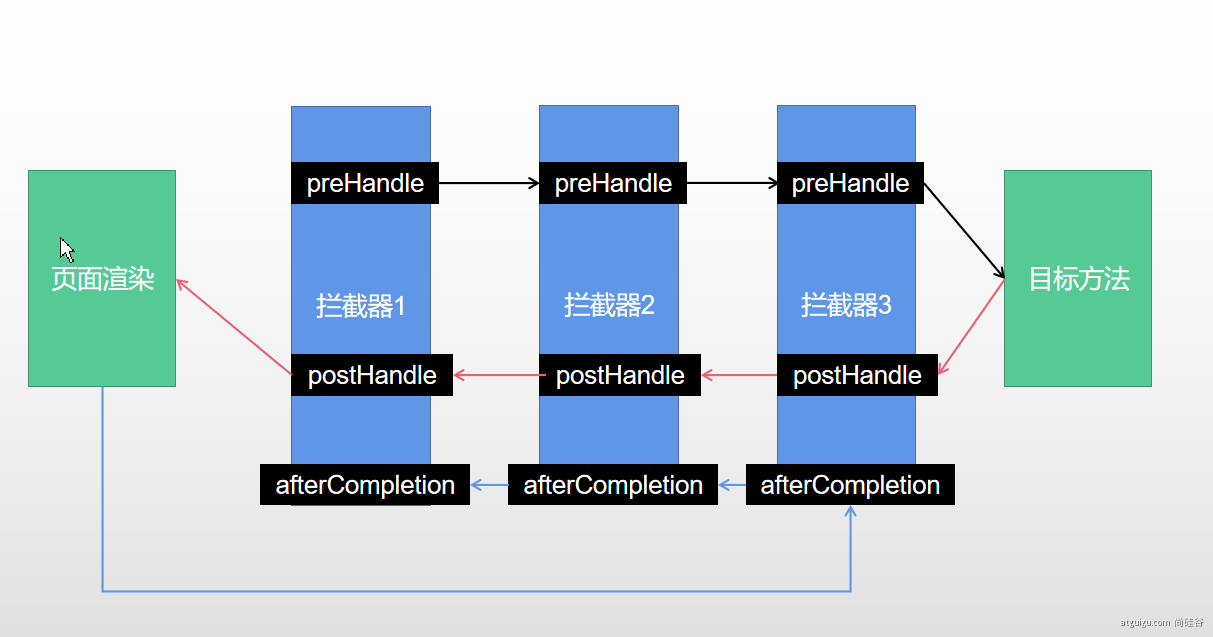
拦截器执行流程

七、文件上传

7.1 实现上传和接收

页面表单:

1
2
3
4
5
6
7
8
9
10
11
12
<!-- 文件上传的类型一定要是multipart/form-data -->
<form role="form" th:action="@{/upload}" method="post" enctype="multipart/form-data">
<input type="email" name="email" placeholder="Enter email">
<input type="text" name="username" placeholder="name">

<!-- 单文件上传 -->
<input type="file" name="headerImg">

<!-- 多文件上传 -->
<input type="file" name="photos" multiple>
<button type="submit">提交</button>
</form>

服务端处理:

1
2
3
4
5
6
7
8
9
10
11
12
13
14
15
16
17
18
19
20
21
22
@PostMapping("/upload")
public String upload(@RequestParam("email") String email,
@RequestParam("username") String username,
@RequestPart("headerImg") MultipartFile headerImg,
@RequestPart("photos") MultipartFile[] photos) throws IOException {

if(!headerImg.isEmpty()){
//保存到文件服务器,OSS服务器等。这里以保存到本地为例
String originalFilename = headerImg.getOriginalFilename();
headerImg.transferTo(new File("H:\\cache\\"+originalFilename));
}

if(photos.length > 0){
for (MultipartFile photo : photos) {
if(!photo.isEmpty()){
String originalFilename = photo.getOriginalFilename();
photo.transferTo(new File("H:\\cache\\"+originalFilename));
}
}
}
return "main";
}

服务端使用 @RequestPart注解和MultipartFile类型来处理文件类型的数据。

7.2 文件上传原理

1、文件上传配置类MultipartAutoConfiguration自动配置好了文件上传解析器StandardServletMultipartResolver,其组件id为multipartResolver

2、对于接收到的请求,文件上传解析器判断(isMultipart)并封装(resolveMultipart),返回文件上传请求MultipartHttpServletRequest

3、参数解析器解析请求中的文件内容,并封装成MultipartFile

4、将request中的文件信息封装为Map,即MultiValueMap<String, MultipartFile>,实现文件流的拷贝。

八、异常处理

8.1 默认规则

默认情况下,Spring Boot提供/error处理所有错误的映射。

对于机器客户端,它将生成JSON响应,其中包含错误,HTTP状态和异常消息的详细信息。

对于浏览器客户端,响应一个“Whitelabel”错误视图,以HTML格式呈现相同的数据。

1
2
3
4
5
"timestamp":"2020-11-22T05:53: 28.416+00: 00",
"status": 404,
"error":"Not Found",
"message":"No message available",
"path":"/..."

如果相对其自定义,可以手动添加一个error视图。

其中,/error目录下的4xx,5xx页面会被自动解析,按照状态码匹配,优先精准匹配,没有就模糊匹配。

8.2 定制错误处理逻辑

8.2.1 自定义错误页

自定义错误页:将4xx.html和5xx.html错误页放到/templates/static目录下的error文件夹,即可自动匹配。优先精确匹配,然后模糊匹配。都没有,则返回WhilteLabel

当发生异常时,底层会结束当前请求,并记录错误信息和状态码等信息;然后重新发送一个error请求,将HTTP的状态码作为视图页地址(viewName),找到error/4xx.html等错误页。

8.2.2 自定义异常处理

1、使用@ControllerAdvice+@ExceptionHandler处理全局异常

比如处理空指针异常、除数为0时的异常等,可以使用这种方式。当发生指定的错误时,会执行这个方法。

底层是ExceptionHandlerExceptionResolver支持的。

1
2
3
4
5
6
7
8
9
10
11
12
// 处理整个Web controller的异常,通常是全局指定类型的异常。
@ControllerAdvice //是一种增强的Component注解
public class GlobalExceptionHandler {
//指定这个方法能够处理的异常类型
@ExceptionHandler({ArithmeticException.class,NullPointerException.class})
public String handlerArithException(Exception e){
...//进行一些处理

//即使出现异常,也应该返回一个ModelAndView
return "login";
}
}

2、使用@ResponseStatus+自定义异常类

比如处理具体某个方法出现错误时,抛出自定义异常和异常信息。

1
2
3
4
5
6
7
8
9
//表示当发生这个类的异常时,返回给页面什么样的状态码;
//以403为例,返回状态码403和错误原因
@ResponseStatus(value = HttpStatus.FORBIDDEN,reason="用户数量太多")
public class UserTooManyException extends RuntimeException{
public UserTooManyException(){ }
public UserTooManyException(String message){
super(message);
}
}

如果出现这个类的异常,会返回状态码403和错误信息。比如 throw new UserTooManyException()时,就会触发这个异常,然后返回信息。

3、自定义异常解析器

自定义的异常解析器,可以作为默认的全局异常处理规则。

1
2
3
4
5
6
7
8
9
10
11
12
13
14
15
16
17
18
19
//使我们自定义的异常解析器处于最高优先级
@Order(value = Ordered.HIGHEST_PRECEDENCE) //数字越小,优先级越高
@Component
public class CustomerHandlerExceptionResolver implements HandlerExceptionResolver {
@Override
public ModelAndView resolveException(HttpServletRequest request,
HttpServletResponse response,
Object handler,
Exception ex) {

try {
//指定状态码的值和错误信息,第一个参数的值就做为状态码
response.sendError (598,"自定义异常解析器");
} catch (IOException e) {
e.printStackTrace();
}
return new ModelAndView();
}
}

底层会优先遍历DefaultErrorAttributesHandlerExceptionResolverComposite这两个,第二个里面又有三个解析器,会处理所有异常。因此想要使我们自定义的生效,必须将其优先级放到默认的两个前面。

sendError()方法表示此次请求立即结束,底层tomcat服务器会抛出error,SpringMVC底层会专门处理这个error,即BasicErrorController处理。

调用response.sendError(),请求会转给controller处理,如果没有解析器能够处理,则tomcat底层会执行这个方法,交给basicErrorController处理。

8.3 异常处理原理

1、执行目标方法,目标方法运行期间有任何异常都会被catch,而且标志当前请求结束;并且用 dispatchException保存catch到的异常。

2、进入视图解析流程:

1
2
processDispatchResult(processedRequest, response, mappedHandler, 
mv, dispatchException);

有异常时,mv为null,异常信息被保存到dispatchException

3、mv = processHandlerException;用于处理handler发生的异常,并处理完成返回ModelAndView,具体步骤如下:

  • 遍历所有的handlerExceptionResolvers,找到能处理这个异常的解析器。
  • 系统默认有两个异常解析器,即DefaultErrorAttributesHandlerExceptionResolverComposite。默认情况下,DefaultErrorAttributes先处理异常,把异常信息保存到请求域,并返回null
  • 默认情况下,没有解析器能处理异常,因此异常会被抛出:
    • 异常不能处理,则底层会发出/error请求,被底层的BasicErrorController处理
    • 解析错误视图,遍历所有的错误视图解析器,看谁能处理。
    • 默认的DefaultErrorViewResolver,作用是把响应状态码作为错误页的地址,比如error/500.html
    • 模版引擎最终会响应这个页面error/500.html

错误页面的查找顺序:

1
2
3
4
'/templates/error/500.<ext>'
'/static/error/500.html'
'/templates/error/5xx.<ext>'
'/static/error/5xx.html'

九、原生组件注入与嵌入式Servlet容器

9.1 原生组件注入

Web原生组件,比如servlet、filter、listener注入,有两种方式。

方式一:使用Servlet API注解

@WebServlet(urlPatterns = "/my")

`@WebFilter(urlPatterns={"/css/*","/images/*"})

@WebListener

1
2
3
4
5
6
7
8
@WebServlet(urlPatterns = "/my")
public class MyServlet extends HttpServlet {
@Override
protected void doGet(HttpServletRequest req, HttpServletResponse resp)
throws ServletException, IOException {
resp.getWriter().write("hello");
}
}

用在自定义的servlet类中。这样,http://localhost:8080/my就可以返回”hello”

/my请求会直接响应,没有被拦截器拦截

如果使用以上注解,需要在主类中使用@ServletComponentScan进行扫描,用于指定原生Servlet、filter、listener组件的位置。

1
2
3
4
5
6
7
@ServletComponentScan(basePackages = "com.kang.admin")
@SpringBootApplication
public class Application {
public static void main(String[] args) {
SpringApplication.run(Application.class, args);
}
}

为什么这里定义的/my没有被拦截器拦截呢?

SpringMVC的请求优先经过DispatcherServlet,需要对其进行分析:

  • 容器中自动配置了DispatcherServlet,属性绑定到WebMvcProperties;对应的配置文件配置项是 spring.mvc

    配置spring.mvc.servlet.path为dispatchSerlvet中拦截的路径

    配置server.servlet.context-path为上下文路径,请求访问的前缀

  • 也是通过 ServletRegistrationBean<DispatcherServlet>把 DispatcherServlet 配置进来。

  • 默认映射的是/路径

Tomcat-Servlet,如果多个Servlet都能处理到同一层路径,精确优先原则。因此对于//my来说,/my请求精准匹配到自定义的servlet,因此不会经过dispatcherServlet处理,所以不会被拦截器拦截。

方式二:使用RegistrationBean

如果不使用注解,还可以手动实现一个配置类,将它们注入。

在配置类中:

1
2
3
4
5
6
7
8
9
10
11
12
13
14
15
16
17
18
19
20
21
22
23
24
25
26
27
28
29
@Configuration
public class MyRegistConfig {
//注入servlet
@Bean
public ServletRegistrationBean myServlet(){
MyServlet myServlet = new MyServlet();
//指定要映射的请求,可以指定多个
return new ServletRegistrationBean(myServlet,"/my","/my01");
}

//注入filter
@Bean
public FilterRegistrationBean myFilter(){
MyFilter myFilter = new MyFilter();
//方式一:使用过滤现有的servlet请求路径
//return new FilterRegistrationBean(myFilter,myServlet());

//方式二:自定义过滤路径
FilterRegistrationBean filterRegistrationBean = new FilterRegistrationBean(myFilter);
filterRegistrationBean.setUrlPatterns(Arrays.asList("/filter","/filter2"));
return filterRegistrationBean;
}
//注入listener
@Bean
public ServletListenerRegistrationBean myListener(){
MyServletContextListener myServletContextListener = new MyServletContextListener();
return new ServletListenerRegistrationBean(myServletContextListener);
}
}

9.2 嵌入式Servlet容器

SpringBoot内嵌了web服务器,比如tomcat、Jetty、Undertow。默认使用的是tomcat

pom.xml中排除tomcat依赖,再将要切换到的服务器的starter导入即可实现切换:

1
2
3
4
5
6
7
8
9
10
<dependency>
<groupId>org.springframework.boot</groupId>
<artifactId>spring-boot-starter-web</artifactId>
<exclusions>
<exclusion>
<groupId>org.springframework.boot</groupId>
<artifactId>spring-boot-starter-tomcat</artifactId>
</exclusion>
</exclusions>
</dependency>

我们还可以定制servlet容器,根据文档或者仿照源码。

十、定制化总结

SpringBoot中的Web项目定制化的几种方式

  • 修改配置文件;
  • xxxxxCustomizer定制器;

  • 编写自定义的配置类,然后用@Bean替换、增加容器中默认组件;

  • 对于Web应用,还可以编写一个配置类实现WebMvcConfigurer接口, 即可定制化web功能;使用@Bean可以给容器中再扩展一些组件;比如:
1
2
@Configuration
public class AdminWebConfig implements WebMvcConfigurer
  • @EnableWebMvc + WebMvcConfigurer可以全面接管SpringMVC,使用这种方式,所有自动配置的功能会全部失效,需要全部自己重新配置; 配合@Bean实现定制和扩展功能。

@EnableWebMvc会使SpringBoot关于WebMVC的自动配置全部失效,其功能都需要自己写。

一般分析自动配置的流程:场景启动器—>xxxAutoConfiguration—>导入xxx组件,绑定xxxProperies—>其绑定了配置文件中的配置项。

查看评论