一、SpringMVC介绍 1.1 MVC 传统的三层架构:
MVC,即
View:视图,主要负责显示数据和提交数据。比如JSP,HTML页面
Model:模型,承载数据,并对用户提交请求进行计算的模块。包括数据承载(bean )和业务处理(service 、dao )两部分。
Controller:控制器,用于将用户请求转发给相应的Model进行处理,并处理Model的计算结果向用户提供响应。
MVC也演化出了其他的模式,比如MVP、MVVM等。
MVC架构的工作流程大致如下:
用户通过View页面向服务端发起请求。
服务端Controller控制器接受请求并进行解析,找到相应的Model对用户请求进行处理。
Model处理后,将处理结果交给Controller。
Controller接到结果以后发给View,将渲染后的页面响应给用户。
没有SpringMVC之前的web应用主要经历了两个阶段:
Model1时代 :主要有视图层和模型层,JSP将控制逻辑和表现逻辑混杂在一起,职责过重,不便于维护。Model2时代 :项目分为模型(bean,dao)、视图(JSP)、控制(Servlet)三部分,但这种模式的抽象和封装程度远远不够,因此有了Struts、SpringMVC等MVC框架。
1.2 SpringMVC Spring MVC 是Spring Framework的一部分,是基于Java实现MVC的轻量级Web框架。
SpringMVC功能强大,支持RESTful、数据验证、本地化、国际化、拦截器等功能。
SpringMVC中的DispatcherServlet用于控制所有请求,将请求分发到不同的处理器,而传统的项目中每个servlet只能处理一个请求。
二、SpringMVC的工作原理 SpringMVC主要是以DispatcherServlet(前端控制器、请求分发器)为核心。这个类继承于HttpServlet类,本质上是一个servlet。
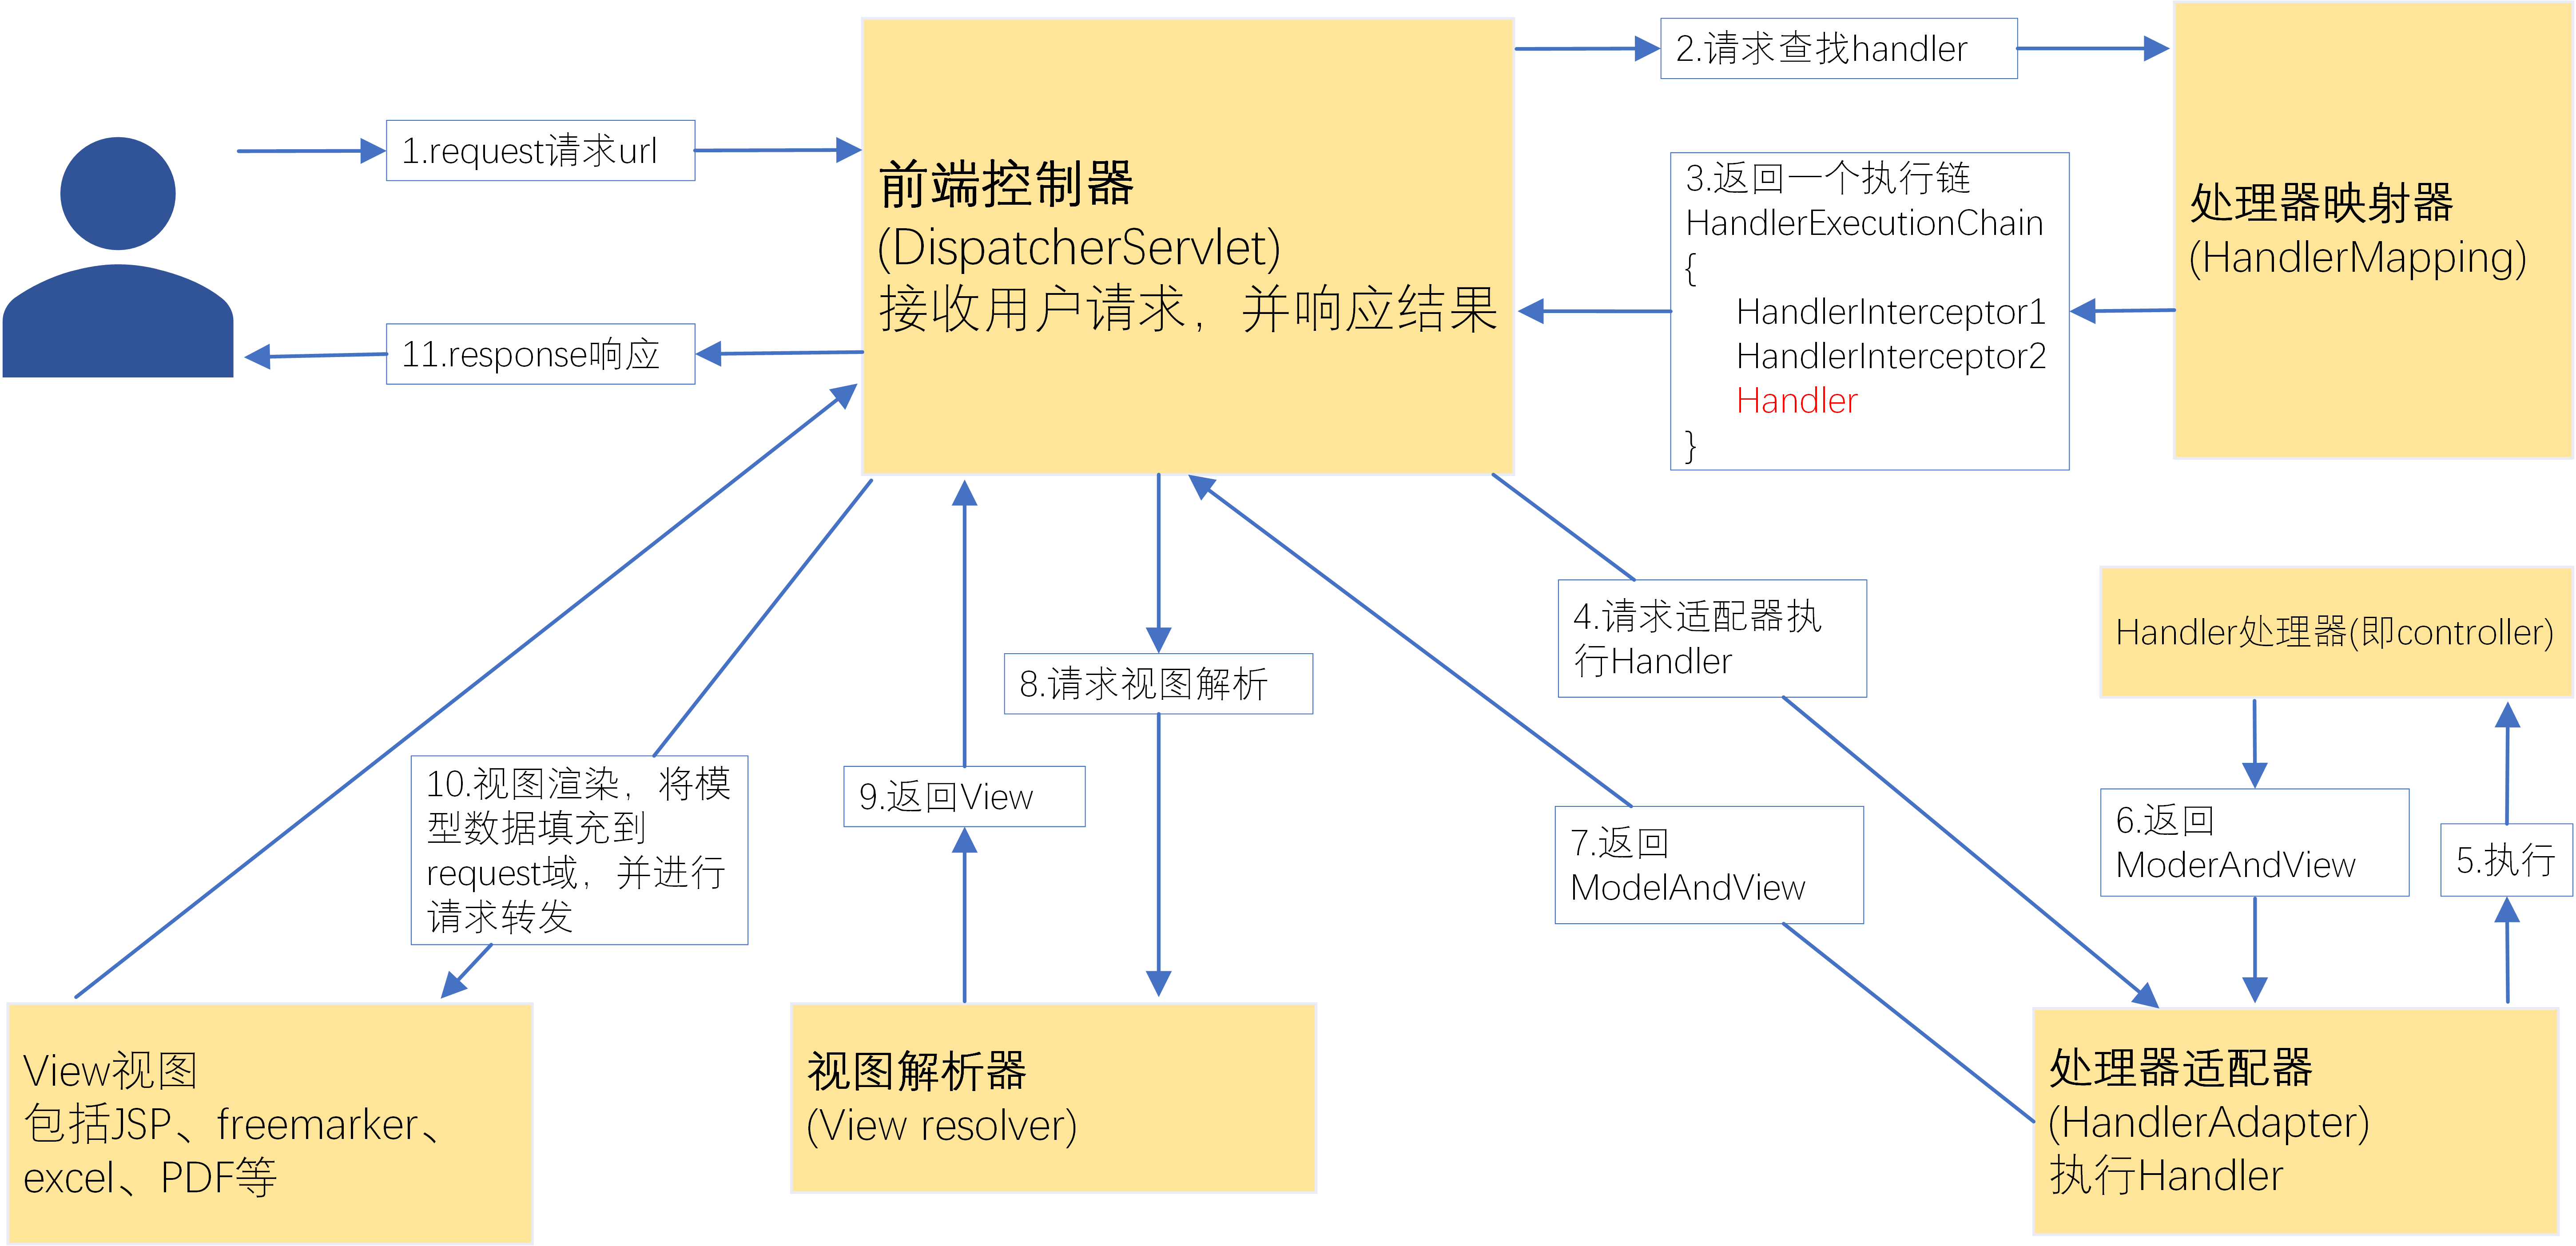
SpringMVC的主要工作流程如下:
SpringMVC工作原理
1、用户发送请求,请求会被 DispatcherServlet接收。
2、DispatcherServlet 根据请求信息,调用 HandlerMapping来解析请求对应的 Handler。
3、解析到对应的 Handler(也叫做 Controller 控制器)后,交给由 HandlerAdapter 适配器处理。
4、HandlerAdapter 会根据 Handler来调用真正的处理器来处理请求,并处理相应的业务逻辑。
5、处理器处理完业务后,会返回一个 ModelAndView 对象,Model 是返回的数据对象,View 是个逻辑上的视图(字符串表示的视图逻辑名,比如JSP页面名)。
ModelAndView对象包括了ModelMap和view两个属性,ModelMap用于保存数据,比如请求查询得到的结果对象,view用于保存逻辑视图名。
6、DispatcherServlet 将逻辑View传递给ViewResolver 视图解析器,它会根据 逻辑View 查找实际的 View(即根据名称找到真正的页面)并创建视图,返回给DispatcherServlet 。
视图解析器根据设置好的前缀路径和后缀名,进行拼接,确定视图的位置,然后创建View接口的实现类对象,也就是视图对象,将其返回给请求分发器。
7、DispaterServlet 把视图解析器返回的 View 进行视图渲染,并将模型数据填充到request域。
视图就是html、jsp等页面。在底层源码中视图渲染会将Model里面的键值对数据全部写到requestScope中(前端可以通过EL表达式从域对象中获取数据),然后进行请求转发 到指定的页面,最后将这个页面相应给用户。
也就是说,ModelAndView中的数据对象会被放在请求域中。
8、最后,DispaterServlet 向用户响应结果。
将响应数据放到Response中返回给用户。
三、SpringMVC的使用 使用SpringMVC创建web项目,需要一个springmvc-servlet.xml配置文件用来配置处理器映射器、处理器适配器和视图解析器。然后在web.xml文件中配置请求分发器。
使用Maven框架,可以使用IDEA的Web模版创建web项目;
也可以先创建普通Maven模块,然后右键Add Framework Support,添加Web框架支持。这种方式创建web项目,需要在Project Structure->Artifacts中,在WEB-INF目录中创建lib文件夹,然后将用到的所有jar包添加进去。如下图:
在项目发布目录手动添加jar包
创建完项目以后,基本的目录结构如下:
SpringMVC项目的基础目录
DispatcherServlet是SpringMVC的核心,其实现方式有两种,分别是实现Controller接口 和使用@Controller注解 。
无论是哪种方式,web.xml配置文件都是一样的,在其中需要配置请求分发器(前端控制器)。
web.xml
1
2
3
4
5
6
7
8
9
10
11
12
13
14
15
16
17
18
19
20
21
22
23
24
25
<?xml version="1.0" encoding="UTF-8"?> <web-app xmlns ="http://xmlns.jcp.org/xml/ns/javaee" xmlns:xsi ="http://www.w3.org/2001/XMLSchema-instance" xsi:schemaLocation ="http://xmlns.jcp.org/xml/ns/javaee http://xmlns.jcp.org/xml/ns/javaee/web-app_4_0.xsd" version ="4.0" > <servlet > <servlet-name > springmvc</servlet-name > <servlet-class > org.springframework.web.servlet.DispatcherServlet</servlet-class > <init-param > <param-name > contextConfigLocation</param-name > <param-value > classpath:springmvc-servlet.xml</param-value > </init-param > <load-on-startup > 1</load-on-startup > </servlet > <servlet-mapping > <servlet-name > springmvc</servlet-name > <url-pattern > /</url-pattern > </servlet-mapping > </web-app >
其中的配置说明:
contextConfigLocation表示装入配置文件,这个路径应该是Spring的总配置文件。如果不指定,默认加载/WEB-INF/applicationContext.xml,如果想自定义名称,则需要指定路径。load-on-startup:用于标记容器是否应该在web应用程序启动的时候就加载这个servlet(实例化并调用init()方法)。值必须是整数,表示servlet被加载的顺序。如果值为负数或者没有设置,则当这个servlet被请求时再加载。如果值为0或正整数,表示容器启动时就加载这个servlet,数值越小优先级越高,数值相同时按照声明顺序加载。
/:匹配所有的请求,但不会匹配JSP、HTML等静态资源。
/*:匹配所有的请求,包括静态资源。这里不能使用/*,因为如果把JSP页面当作请求的话,如果视图解析器的后缀也是JSP,会陷入无限请求中导致请求失败。
3.1 方式一:实现Controller接口 其中实现接口的方式需要在Spring配置文件中注册bean,为了能够使映射器根据名字找到对应的Handler。
1、配置springmvc-servlet.xml文件
1
2
3
4
5
6
7
8
9
10
11
12
13
14
15
16
17
18
19
20
21
22
23
24
25
<?xml version="1.0" encoding="UTF-8"?> <beans xmlns ="http://www.springframework.org/schema/beans" xmlns:xsi ="http://www.w3.org/2001/XMLSchema-instance" xsi:schemaLocation ="http://www.springframework.org/schema/beans http://www.springframework.org/schema/beans/spring-beans.xsd" > <bean class ="org.springframework.web.servlet.handler.BeanNameUrlHandlerMapping" /> <bean class ="org.springframework.web.servlet.mvc.SimpleControllerHandlerAdapter" /> <bean class ="org.springframework.web.servlet.view.InternalResourceViewResolver" id ="internalResourceViewResolver" > <property name ="prefix" value ="/WEB-INF/jsp/" /> <property name ="suffix" value =".jsp" /> </bean > <bean id ="/test" class ="com.kang.controller.HelloController" /> </beans >
说明 :
Controller的id必须加/视图解析器根据视图名,加上前缀和后缀定位视图。
这里的映射器和适配器都是默认的,不注册也可以正常使用,这里为了便于理解,将其显式写出来。
2、创建控制器类,实现Controller接口 ,在java/com/kang/controller目录下创建控制器类。
HelloController
1
2
3
4
5
6
7
8
9
10
11
12
13
14
15
16
17
package com.kang.controller;public class HelloController implements Controller @Override public ModelAndView handleRequest (HttpServletRequest httpServletRequest, HttpServletResponse httpServletResponse) throws Exception {new ModelAndView();"HelloSpringMVC" ;"msg" ,result); "test" ); return mv;
mv.addObject("msg",result);表示添加数据到ModelAndView对象,这个数据最终会被请求转发器添加到requestScope中。在前端页面就可以使用EL表达式从requstScope中取到数据:${requestScope.msg}
mv.setViewName("test");用于指定要请求转发的视图名字。
这个ModelAndView对象返回给请求分发器,然后经过视图解析器解析、视图渲染等步骤,最终将带有数据的视图写入response中响应给用户。
3.2 方式二:使用@Controller注解 使用注解不需要显式注册bean,而是在类中使用@Controller注解,自动将当前类注册为控制器类。
@Controller效果和@Component注解类似,都表示将当前类交给Spring托管。
与之类似的还有@Service用于service层,@Repository用于dao层。
被@Controller注解的类中的所有方法(公有私有都包括),如果返回值是String,并且有具体的页面与之对应,就会被视图解析器解析。
如果想要方法的返回值不被视图解析器解析,可以使用在方法上使用@ResponseBody注解,表示当前方法的返回值直接写入到HTTP响应(response)体中,一般返回的是JSON或XML形式的数据,是前后端分离情况下常用的情况。详情参见下文JSON章节
使用注解时,配置文件和控制类的内容和方式一不同。
1、配置spring-mvc.xml文件
1
2
3
4
5
6
7
8
9
10
11
12
13
14
15
16
17
18
19
20
21
22
23
<?xml version="1.0" encoding="UTF-8"?> <beans xmlns ="http://www.springframework.org/schema/beans" xmlns:xsi ="http://www.w3.org/2001/XMLSchema-instance" xmlns:context ="http://www.springframework.org/schema/context" xmlns:mvc ="http://www.springframework.org/schema/mvc" xsi:schemaLocation ="http://www.springframework.org/schema/beans http://www.springframework.org/schema/beans/spring-beans.xsd http://www.springframework.org/schema/context https://www.springframework.org/schema/context/spring context.xsd http://www.springframework.org/schema/mvc https://www.springframework.org/schema/mvc/spring-mvc.xsd" ><context:component-scan base-package ="com.kuang.controller" /> <mvc:default-servlet-handler /> <mvc:annotation-driven /> <bean class ="org.springframework.web.servlet.view.InternalResourceViewResolver" id ="internalResourceViewResolver" > <property name ="prefix" value ="/WEB-INF/jsp/" /> <property name ="suffix" value =".jsp" /> </bean > </beans >
参数说明 :
<context:component-scan>
1 表示自动扫描包,让指定包下的注解生效,由IOC容器统一管理
<mvc:default-servlet-handler/>
1 2 3 4 5 用于过滤静态资源,让SpringMVC 不处理静态资源,比如.txt 、.mp3 、.jpg 等。Spring MVC 上下文中定义一个org .springframework .web .servlet .resource .DefaultServletHttpRequestHandler ,DispatcherServlet 的URL 进行筛查,Web 应用服务器默认的Servlet 处理;DispatcherServlet 继续处理。
<mvc:annotation-driven/>
1 2 3 4 5 6 7 8 9 10 11 12 13 用于配置注解驱动。annotation -driven 配置帮助我们自动完成上述两个实例的注入。annotation -driven 的作用就是提供扩展功能。
2、创建Controller类
1
2
3
4
5
6
7
8
@Controller public class HelloController @RequestMapping("/hello1") public String myController (Model model) "msg" ,"hello,MVC-Annocation" );return "hello" ;
我们自定义方法的返回值是视图名,相当于在Spring的XML文件中配置了id为hello的bean,用于映射器查找到对应的控制器。在方法中可以使用Model对象、ModelMap对象、ModelAndView对象三种方式向请求域 中传递数据,也就是向前端页面传递数据,具体使用方法见下文。
注解说明:
@Controller:将当前类注册为Controller,类似于实现Controller接口。
@RequestMapping:表示映射hello请求到这个方法,也就是说当请求为hello时,会执行这个被其注解的方法。也可以用在类中,表示当前类中的每个方法的共同请求前缀,比如下面的案例,只有当请求为/test/hello时才会执行myController方法。
1 2 3 4 5 6 @RequestMapping("/test") public class HelloController @RequestMapping("/hello") public String myController ()
@RequestMapping默认为任何请求方式,也可以在参数中指定请求方式,比如设置为POST请求方式:
1 @RequestMapping(value = "/hello",method = RequestMethod.POST)
HTTP的几种请求方式参考HTTP请求方法
对于具体的请求方式,还可以使用其对于的注解,比如@GetMapping、@PostMapping
@PutMapping、@DeleteMapping等,其作用和@RequestMapping相同,不过是固定了具体的请求方式。
四、SpringMVC的结果跳转 使用@Controller方式的控制器,页面跳转可以使用视图解析器,也可以不使用视图解析器。
1.使用视图解析器
使用视图解析器的时候,只需要返回视图名字即可,或者返回带有视图名字属性的ModelAndView对象。
1 2 3 4 5 6 7 8 9 10 11 12 13 14 15 16 17 18 19 20 21 22 @Controller public class HelloController implements Controller @RequestMapping("/hello") public String myController () return "test" ;@Controller public class HelloController implements Controller @RequestMapping("/hello") public ModelAndView myController () new ModelAndView();"test" );return mv;
以上两种方式都是使用视图解析器时的写法,都是将视图名传递给视图解析器。前提是SpringMVC的配置文件中注册了视图解析器。
2.直接返回
如果不使用视图解析器,也可以直接将视图返回。由于没有视图解析器的路径拼接,所以方法的返回值应该是真实不需要拼接的视图地址。
如果不指定前缀,默认表示请求转发。
不指定forward或redirect,则必须保证视图解析器关闭或注释掉,否则视图解析器仍会拼接结果。
如果指定了前缀,则会按照指定的方式转发或重定向,并且不会经过视图解析器(即使开启了视图解析器)。
1
2
3
4
5
6
7
8
9
@Controller public class ModelTest @RequestMapping("/test2") public String test2 () return "redirect:/index.jsp" ;
这里要注意的是,如果是重定向,因为重定向是客户端重新发起请求,因此必须保证此页面可以通过URL直接访问。
3.使用ServletAPI
使用HttpServletRequest进行请求转发或者HttpServletResponse进行重定向。不需要视图解析器.
1
2
3
4
5
6
7
8
9
10
11
@Controller public class ModelTest1 @RequestMapping("/test3") public void test3 (HttpServletRequest request, HttpServletResponse response) throws ServletException, IOException {"msg" ,"ModelTest1" );"/WEB-INF/jsp/hello.jsp" ).
可以使用ServletAPI进行手动请求转发或者重定向,同样不需要视图解析器。
五、SpringMVC中的数据处理 SpringMVC中的数据处理主要是两方面,一个是后端如何接收前端传来的数据,第二个是后端如何向前端传递数据。
在前端页面中,我们可以使用EL表达式从域对象中取出数据;通过表单等方式提交数据。
5.1 控制器接收数据 控制器对于前端传来的数据可以直接通过参数进行接收。可以分为以下三种情况。
以下案例以GET请求方式为例
1、传递的参数名和方法的参数名一致
url:http://localhost:8080/SpringMVC_04/user/t1?name=spring
1
2
3
4
5
6
7
8
9
10
11
12
13
@Controller @RequestMapping("/user") public class UserController @PostMapping("/t1") public String acceptData (String name, Model model) "msg" ,name);return "hello" ;
可以看到,请求的参数名称和方法的参数名称能够对应起来,因此方法中的name参数可以接收来自请求的数据,然后方法就可以对数据做一些操作。
2、传递的参数名和方法的参数名不一致
当传递的参数名和方法的参数名不一致的时候,需要使用@RequestParam注解指定对应关系。
url:http://localhost:8080/SpringMVC_04/user/t1?username=spring
1
2
3
4
5
6
7
8
9
10
11
12
13
@Controller @RequestMapping("/user") public class UserController @GetMapping("/t1") public String acceptData (@RequestParam("username") String name, Model model) "msg" ,name);return "hello" ;
@RequestParam是一个参数注解,用到参数前,表示将请求的参数名和方法参数名对应起来,注解中的值为请求的参数名。
比如上述代码的请求参数名是username,则注解中的值也为username,表示name这个参数将接收来自客户端请求中的username参数值。
3、传递的是一个对象
如果提交的表单是一个复杂的对象,则方法参数使用对象类型即可。
比如现在有一个User类定义如下:
1
2
3
4
5
public class User private int id;private String name;private int age;
url:http://localhost:8080/SpringMVC_04/user/t1?name=kang&id=1&age=20
1
2
3
4
5
6
7
8
9
10
11
12
@Controller @RequestMapping("/user") public class UserController @GetMapping("/t2") public String test2 (User user, Model model) "msg" ,"accept user" );return "hello" ;
这种方法需要保证请求参数的名称和对象属性名一致,如果名称不一致,则属性值为null。
5.2 控制器传递数据 前面提到过,控制器有三种方式向请求域 中传递数据,即向前端页面传递数据。
这一过程对应于SpringMVC工作原理图中的第6、7步,即控制器返回ModelAndView。
1、使用Model Model是一个接口。能够满足大部分传递数据的需求。比较简单,只适合用于存储数据。
使用Model传递数据:
1
2
3
4
5
6
7
8
9
@Controller public class MyController @RequestMapping("/hello") public String test (Model model) "msg" ,"hello,SpringMVC" );return "hello" ;
需要注意的是,这种方法需要将Model写在参数中,使用时可以调用addAttribute()方法写入数据。
2、使用ModelMap ModelMap是一个类,继承了LinkedHashMap,其除了拥有和Model相同的功能以外,还具有LinkedHashMap的所有功能。
使用ModelMap传递数据的用法和Model相同:
1
2
3
4
5
6
7
8
@Controller public class MyController @RequestMapping("/hello") public String test (ModelMap modelMap) "msg" ,"hello,SpringMVC" );return "hello" ;
注意:ModelMap和Model不是实现和被实现的关系,ModelMap可以看作一个增强版的Model。
ModelMap类的源码声明如下:
1
2
3
4
public class ModelMap extends LinkedHashMap <String , Object > public ModelMap ()
3、使用ModelAndView ModerAndView是一个类,其属性中包括了一个Object类型的view属性,也包括了一个ModelMap对象model。model是数据对象,view是视图,可以是视图名,也可以是视图对象。
除了在实现Controller接口重写方法时使用ModelAndView,还可以在自定义方法中使用。
1
2
3
4
5
6
7
8
9
10
@Controller public class HelloController @RequestMapping("/hello") public ModelAndView myController () new ModelAndView();"msg" ,"hello,SpringMVC" ); "hello" ); return mv;
使用ModelAndView时,方法的返回值必须是ModelAndView类型,就是将ModelAndView对象传递给请求分发器。
ModelAndView源码:
1
2
3
4
5
6
7
8
9
10
11
12
13
14
15
16
17
18
19
20
21
22
public class ModelAndView @Nullable private Object view; @Nullable private ModelMap model; @Nullable private HttpStatus status;private boolean cleared = false ;public ModelAndView () public void setViewName (@Nullable String viewName) this .view = viewName;public ModelAndView addObject (String attributeName, @Nullable Object attributeValue) this .getModelMap().addAttribute(attributeName, attributeValue);return this ;
通过源码可以看出,setViewName()方法是设置视图名给view,addObject()方法是调用ModelMap类的方法添加数据。
总结
5.3 前端向后端传递数据时的乱码问题 前端向后端传递数据时,由于客户端浏览器编码方式的问题,传到后端时为乱码,此时可以使用SpringMVC提供的过滤器CharacterEncodingFilter,在web.xml文件中配置过滤器:
1
2
3
4
5
6
7
8
9
10
11
12
13
14
15
16
17
18
19
20
21
22
23
24
25
<?xml version="1.0" encoding="UTF-8"?> <web-app xmlns ="http://xmlns.jcp.org/xml/ns/javaee" xmlns:xsi ="http://www.w3.org/2001/XMLSchema-instance" xsi:schemaLocation ="http://xmlns.jcp.org/xml/ns/javaee http://xmlns.jcp.org/xml/ns/javaee/web-app_4_0.xsd" version ="4.0" > <filter > <filter-name > encoding</filter-name > <filter-class > org.springframework.web.filter.CharacterEncodingFilter</filter-class > <init-param > <param-name > encoding</param-name > <param-value > utf-8</param-value > </init-param > </filter > <filter-mapping > <filter-name > encoding</filter-name > <url-pattern > /*</url-pattern > </filter-mapping > </web-app >
/*过滤所有页面,包括静态资源。
六、JSON 6.1 JSON介绍 JSON(JavaScript Object Notation, JS 对象标记) 是一种轻量级的数据交换格式。JSON采用一种完全独立于编程语言的文本格式来存储和表示数据。语法格式为:
对象保存为键值对 ,数据由逗号分隔;
{}用来保存对象;[]用来保存数组。
比如,一个包括三个User对象的JSON:
1 2 [{"name" :"Tom" ,"age" :3 ,"sex" :"man" },{"name" :"Jerry" ,"age" :4 ,"sex" :"man" },"name" :"Rick" ,"age" :20 ,"sex" :"man" }]
6.2 使用JSON传递数据 对于前后端分离的环境,前后端交互一般是传递的JSON数据。
常用的几个JSON处理工具包:
参考各种json工具包的比较
6.2.1 JS中使用JSON 从JSON字符串转换为JavaScript对象:
1
2
var obj = JSON .parse('{"a": "Hello", "b": "World"}' );
从JavaScript 对象转换为JSON字符串:
1
2
var json = JSON .stringify({a : 'Hello' , b : 'World' });
6.2.2 SpringMVC中返回JSON数据 以Gson为例,使用时需要先创建Gson对象,然后调用方法,如下:
1、将User对象转化为JSON字符串,使用toJson()方法
1 String str = new Gson().toJson(new User(1 ,"张三" ,24 ));
2、将JSON字符串转化为User对象,使用fromJson()方法
1 User user = new Gson().fromJson(str,User.class);
在SpringMVC中使用Gson,需要先导入依赖。
pom.xml:
1 2 3 4 5 <dependency > <groupId > com.google.code.gson</groupId > <artifactId > gson</artifactId > <version > 2.8.6</version > </dependency >
定义User类:
1
2
3
4
5
6
public class User private int id;private String name;private int age;
我们需要控制器的方法直接返回数据,而不是返回视图,这时候就需要使用@ResponseBody注解了。或者直接将当前类注册为RestController。
@ResponseBody:可以用在方法 上,也可以用在类 上。用在方法上表示当前方法返回值不会被视图解析器解析 ,返回值会被直接写入到响应体(response body)中,通常为JSON或XML类型的数据。用在类上则对当前类所有方法生效。
@RestController:只能用在类 上,效果相当于同时使用 @Controller 和@ResponseBody,表示将当前类注册为控制器,且类中所有方法的返回值都返回的是数据对象,不会被视图解析器解析。
@RestController底层仍然是使用了 @Controller 和@ResponseBody。
更多对比,参考@Controller和@RestController
以下为组合使用 @Controller 和 @ResponseBody,单独使用@ResponseBody两种方式,二者效果相同。
1、使用 @Controller 和 @ResponseBody:
1
2
3
4
5
6
7
8
9
10
@Controller public class UserController @ResponseBody @RequestMapping(value = "/json") public String test () new User(1 ,"John" ,24 );new Gson().toJson(user);return str;
2、使用@RestController:
1
2
3
4
5
6
7
8
9
@RestController public class UserController @RequestMapping(value = "/json") public String test () new User(1 ,"John" ,24 );new Gson().toJson(user);return str;
这样客户端可以从响应数据中接收数据。
6.3 使用HttpMessageConverter处理乱码 控制器返回JSON数据时,可能会由于编码不同而出现乱码问题,可以通过配置SpringMVC的StringHttpMessageConverter消息转换器来解决。
在spring的配置文件springmvc-servlet.xml文件的注解驱动中配置消息转换器:
1 2 3 4 5 6 7 8 9 10 11 12 13 14 15 16 17 18 19 <mvc:annotation-driven > <mvc:message-converters register-defaults ="true" > <bean class ="org.springframework.http.converter. StringHttpMessageConverter" ><constructor-arg value ="UTF-8" /> </bean > <bean class ="org.springframework.http.converter.json. MappingJackson2HttpMessageConverter" ><property name ="objectMapper" > <bean class ="org.springframework.http.converter.json. Jackson2ObjectMapperFactoryBean" ><property name ="failOnEmptyBeans" value ="false" /> </bean > </property > </bean > </mvc:message-converters > </mvc:annotation-driven >
七、RESTful 参考理解RESTful架构
REST(Representational State Transfer),表现层状态转化:
每个URI代表一种资源
客户端和服务器之间传递这种资源的表现层
客户端通过四个HTTP请求方式,对服务器资源进行操作,实现“表现层状态转化”。
GET请求用来获取资源,对应查询操作
POST请求用来新建(或更新)资源,对应添加操作
PUT用来更新资源,对于修改操作
DELETE用来删除资源,对于删除操作
可以简单将RESTful理解为资源定位及资源操作的风格。基于这个风格设计的软件可以更简洁,更有层次,更易于实现缓存等机制。
RESTful风格下,请求和参数值都使用/分隔开,同样的请求地址可以根据不同的请求方式,实现不同的功能:
1 2 3 4 http:// 127.0 .0.1 /item/ 1 查询,GET// 127.0 .0.1 /item/ 1 新增,POST// 127.0 .0.1 /item/ 1 更新,PUT// 127.0 .0.1 /item/ 1 删除,DELETE
比如:
1
2
3
4
5
6
7
8
9
10
11
12
13
14
15
16
@Controller public class RestFulController @RequestMapping(value = "/add/{a}/{b}",method = RequestMethod.POST) public String test1 (@PathVariable int a, @PathVariable int b, Model model) int res = a+b;"msg" ,"Result 1:" +res);return "restful" ;@GetMapping("/add/{a}/{b}") public String test2 (@PathVariable int a, @PathVariable int b, Model model) int res = a*b;"msg" ,"Result 2:" +res);return "restful" ;
@PathVariable用于将URI的变量和方法参数对应起来,名称要相同。
对于以上代码,URL为http://localhost:8080/SpringMVC_04/add/3/4时,如果是get请求,会调用第二个方法,结果为12;如果是post请求,调用第一个方法,结果为7。
RESTful风格的优势:
使路径变得更简洁。
获取参数更方便,框架会自动类型转换
通过路径变量的类型约束访问参数,如果类型不对应,会访问不到方法。
八、拦截器 SpringMVC中的拦截器(Interceptor) 类似于servlet中的过滤器(Filter),不同的是:
过滤器在任何web工程都可以使用。拦截器属于SpringMVC框架,只能在SpringMVC框架工程中使用。
过滤器通过/*可以拦截所有要访问的资源。拦截器只会拦截访问的控制器方法。
拦截器和过滤器的区别:https://www.zhihu.com/question/30212464/answer/1786967139
自定义拦截器需要实现HandlerInterceptor接口,接口中的三个默认方法,可以根据需求进行重写。
在项目中使用自定义拦截器步骤如下:
1、定义一个类实现HandlerInterceptor接口
1
2
3
4
5
6
7
8
9
10
11
12
13
14
15
16
17
18
19
20
21
22
23
24
25
26
public class MyInterceptor implements HandlerInterceptor @Override public boolean preHandle (HttpServletRequest request, HttpServletResponse response, Object handler) throws Exception {"=========处理前要执行的操作=========" );return true ; @Override public void postHandle (HttpServletRequest request, HttpServletResponse response, Object handler, ModelAndView modelAndView) throws Exception "=========处理后要执行的操作=========" );@Override public void afterCompletion (HttpServletRequest request, HttpServletResponse response, Object handler, Exception ex) throws Exception "=========清理=========" );
HandlerInterceptor接口有三个方法:
preHandle():请求处理前执行,返回值为true表示放行,如果有的话执行下一个拦截器。返回值为false表示不放行。常用于身份验证等需求中。postHandle():请求完成后执行,一般用于日志处理等后续操作。如果有多个拦截器,这个方法会按照声明顺序倒着执行。afterCompletion():在请求分发器视图渲染之后执行,多用于资源清理。前提是preHandle返回true
2、在SpringMVC配置文件中配置拦截器
1 2 3 4 5 6 7 8 9 10 11 12 13 14 15 16 17 <mvc:interceptors > <mvc:interceptor > <mvc:mapping path ="/**" /> <bean class ="com.kang.config.MyInterceptor" /> </mvc:interceptor > <mvc:interceptor > <mvc:mapping path ="/user/**" /> <bean class ="com.kang.config.LoginInterceptor" /> </mvc:interceptor > </mvc:interceptors >
可以配置多个拦截器,满足不同的需求。
/**:当前所有文件,递归包括所有子文件夹,即包括多级目录。即所有请求,包括子请求。
/*:当前所有文件,不包括子文件夹中的内容,即只包括一级目录。即只有当前请求下的请求,不包括子请求下的请求。
使用情景举例 :使用拦截器确保用户登录才能进入某个页面。当用户访问某个页面的时候,在拦截器中验证是否登陆,如果登陆,则放行;如果未登录,则请求转发或重定向到登录界面。
九、Ajax AJAX(Asynchronous JavaScript and XML) :异步的 JavaScript 和 XML,是一种在无需重新加载整个网页的情况下,能够更新部分网页的技术。
AJAX是一种用于创建更好更快以及交互性更强的Web应用程序的技术。 比如搜索栏动态显示搜索建议;网页登陆时不用刷新网页就提示用户名和密码正确性。
Demo: 在SpringMVC项目中,使用Ajax实现以下功能:
输入用户名后,动态检测用户名是否存在并提示;输入密码后,动态检测密码是否正确并提示。
1、先定义一个控制器类verifyUsernameAndPwd.java:
1 2 3 4 5 6 7 8 9 10 11 12 13 14 15 16 17 18 19 20 21 22 23 24 25 26 @RestController public class AjaxController @RequestMapping("/login") public String login (String name,String pwd) "" ;if (name !=null ){if ("admin" .equals(name)){"ok" ;else {"用户名不存在" ;if (pwd!=null ){if ("123456" .equals(pwd)){"ok" ;else {"密码错误" ;return msg;
2、前端页面
我们使用jquery提供的Ajax方法实现Ajax请求。使用前需要导入Jquery的jar包,或者使用CDN。
login.jsp:
1
2
3
4
5
6
7
8
9
10
11
12
13
14
15
16
17
18
19
20
21
22
23
24
25
26
27
28
29
30
31
32
33
34
35
36
37
38
39
40
41
42
43
44
45
46
47
48
49
50
51
52
53
<%@ page contentType="text/html;charset=UTF-8" language="java" %>function verifyName () {"${pageContext.request.contextPath}/login" ,'name' :$("#name" ).val()},if (data.toString()=='OK' ){"#userInfo" ).css("color" ,"green" );else {"#userInfo" ).css("color" ,"red" );"#userInfo" ).html(data);function verifyPwd () {"${pageContext.request.contextPath}/login" ,'pwd' :$("#pwd" ).val()},if (data.toString()=='OK' ){"#pwdInfo" ).css("color" ,"green" );else {"#pwdInfo" ).css("color" ,"red" );"#pwdInfo" ).html(data);"text" id="name" onblur="verifyName()" />"text" id="pwd" onblur="verifyPwd()" />
上述JS代码中我们使用的$.post调用的是jquery中的post方法,post方法内部调用了ajax方法,我们也可以直接调用ajax方法,都可以完成Ajax请求。
Ajax方法需要关注的几个参数:
url:请求地址。type:请求方式,比如get、post(1.9.0之后用method)。data:要发送的数据。ontentType:发送信息至服务器的内容编码类型。success:成功之后的回调函数。
在上述的Demo中,url就是login请求地址,data就是当前输入框里的内容,success回调函数的功能定义为显示提示信息,比如用户名是否存在、密码是否正确。
十、文件上传与下载 Spring MVC为文件上传提供了直接的支持,这种支持是通过即插即用的MultipartResolver实现的。
Spring MVC使用Apache Commons FileUpload实现了一个MultipartResolver的实现类CommonsMultipartResolver。因此,SpringMVC的文件上传还需要依赖Apache Commons FileUpload的组件。
导入文件上传需要的依赖:
1 2 3 4 5 6 <dependency > <groupId > commons-fileupload</groupId > <artifactId > commons-fileupload</artifactId > <version > 1.3.3</version > </dependency >
10.1 文件上传 文件上传需要确保导入了commons-fileupload依赖。
1、配置bean
1 2 3 4 5 6 7 8 <bean id ="multipartResolver" class ="org.springframework.web.multipart.commons.CommonsMultipartResolver" > <property name ="defaultEncoding" value ="utf-8" /> <property name ="maxUploadSize" value ="10485760" /> <property name ="maxInMemorySize" value ="40960" /> </bean >
其中defaultEncoding表示请求的编码格式,必须和JSP的pageEncoding属性一致,以便正确读取表单的内容,默认为ISO-8859-1.
CommonsMultipartFile类中的常用方法:
String getOriginalFilename():获取上传文件的原名InputStream getInputStream():获取文件流void transferTo(File dest):将上传文件保存到一个目录文件中
2、前端页面
1
2
3
4
5
<!-- 上传文件的编码必须是multipart/form-data -->"/upload" enctype="multipart/form-data" method="post" >"file" name="file" />"submit" value="upload" >
3、控制器实现功能
1
2
3
4
5
6
7
8
9
10
11
12
13
14
15
16
17
18
19
20
21
22
23
24
25
26
27
28
29
30
31
32
33
34
35
36
37
38
39
40
41
42
43
44
45
46
47
48
49
50
51
52
53
54
55
56
57
58
59
60
61
62
@RestController public class FileController @RequestMapping("/upload") public String fileUpload (@RequestParam("file") CommonsMultipartFile file, HttpServletRequest request) throws IOException if ("" .equals(uploadFileName)) {return "redirect:/index.jsp" ;"上传文件名 : " + uploadFileName);"/upload" );new File(path);if (!realPath.exists()) {"上传文件保存地址:" + realPath);new FileOutputStream(new File(realPath, uploadFileName)); int len = 0 ;byte [] buffer = new byte [1024 ];while ((len = is.read(buffer)) != -1 ) {0 , len);return "redirect:/index.jsp" ;@RequestMapping("/upload2") public String fileUpload2 (@RequestParam("file") CommonsMultipartFile file, HttpServletRequest request) throws IOException "/upload" );new File(path);if (!realPath.exists()){"上传文件保存地址:" +realPath);new File(realPath +"/" + file.getOriginalFilename()));return "redirect:/index.jsp" ;
10.2 文件下载 文件下载步骤:
设 response响应头
读取文件 — InputStream
写出文件 — OutputStream
执行操作
关闭流 (先开的后关)
1、编写控制器类
1
2
3
4
5
6
7
8
9
10
11
12
13
14
15
16
17
18
19
20
21
22
23
24
25
26
27
28
29
30
31
32
33
34
35
@RestController public class FileController @RequestMapping(value="/download") public String downloads (HttpServletResponse response, HttpServletRequest request) throws Exception"/upload" );"test.txt" ;"UTF-8" ); "multipart/form-data" ); "Content-Disposition" ,"attachment;fileName=" + URLEncoder.encode(fileName, "UTF-8" ));new File(path,fileName);new FileInputStream(file);byte [] buff =new byte [1024 ];int index=0 ;while ((index= input.read(buff))!= -1 ){0 , index);return null ;
2、前端页面
1 <a href="/download">点击下载</a>
参考 1、b站-SpringMVC
2、Spring常见问题

 SpringMVC工作原理
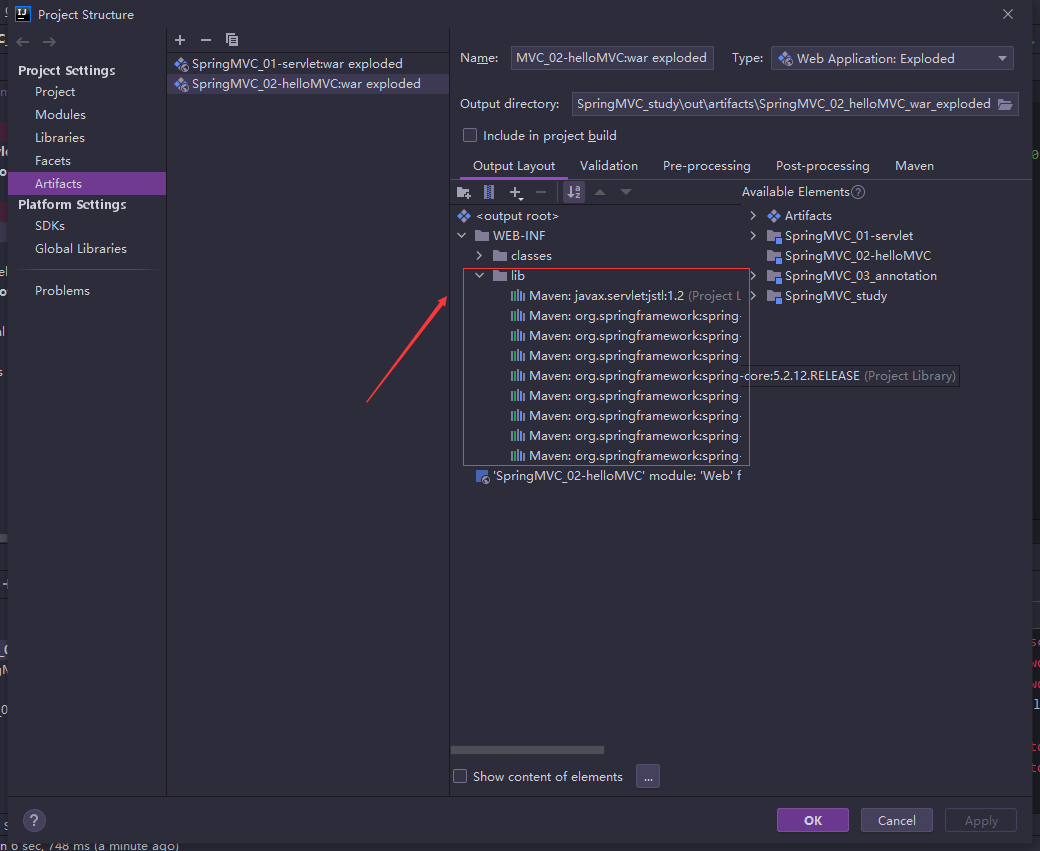 在项目发布目录手动添加jar包
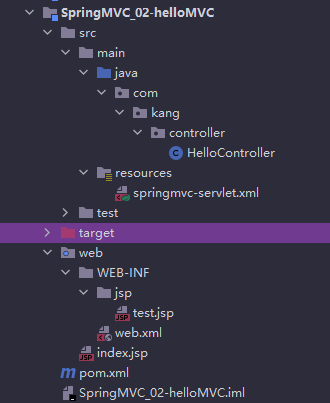 SpringMVC项目的基础目录